Saturday, March 14, 2026
Home Blog Page 9

Ultimate Guide to Football Backgrounds: Designs for Every Fan and Occasion

0

Football transcends the realm of sport; it encompasses a worldwide phenomenon, a community, and a way of life. Regardless of whether you’re supporting your favorite team from the bleachers, viewing the action at home, or flaunting your enthusiasm online, the right football background is a vital means for fans to engage with the sport. This comprehensive guide to football backgrounds will showcase the finest designs for every fan, event, and aim, assisting you in making your digital environment as thrilling as the game.

Why Football Backgrounds Are Important

Football backgrounds serve as more than mere visuals; they embody expressions of fandom, celebrations of triumphs, and links to the worldwide football community. Football backgrounds are a great way to showcase your passion on your desktop, mobile phone, or social media accounts, with millions of fans globally sharing this love.

Ultimate Guide to Football Backgrounds: Designs for Every Fan and Occasion

Ultimate Guide to Football Backgrounds: Designs for Every Fan and Occasion

Whether it’s for custom desktop wallpapers or personalized Facebook headers, football backgrounds can turn your digital spaces into a homage to the sport and your favorite team. These backgrounds also offer a sense of belonging, as fans frequently utilize them to come together over mutual interests and team pride.

Types of Football Backgrounds

There are countless options when it comes to football backgrounds. You can select from a variety of designs, ranging from action-packed images to team-centric ones, according on your own preferences and style. The most popular football background categories are broken down as follows:

1. Backgrounds Particular to Teams
If you’re a huge supporter of a certain team, showing off your devotion with team-specific backdrops is ideal. The team’s colors, logo, mascots, or even the players in action are frequently included in these designs. Football team-themed backdrops can be used as phone backgrounds, social media profiles, or desktop wallpapers.

Advice for developing backgrounds unique to a team:

  • Make the design readily recognized by using the team’s official colors and logo.
  • Watch your favorite player in action as they make a standout play or score a goal.
  • Add team-related chants or slogans to make the design uniquely yours.

2. Overarching Football Themes
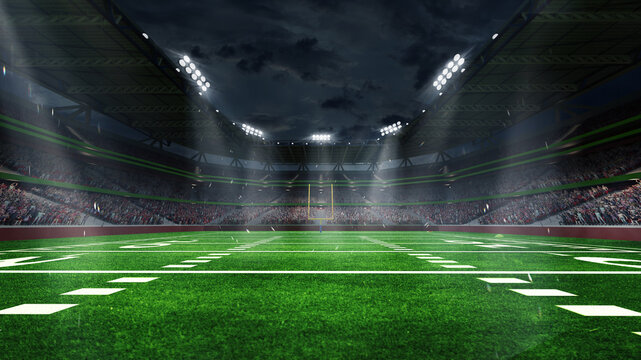
Football is a sport that is about more than simply a single team or player. Take into consideration surroundings that honor the spirit of the sport if you’re a fan of the entire game. Pictures of crowded arenas, football fields, and stadiums are ideal for capturing the thrill of the game.

Common backgrounds with football themes include:

  • football stadiums seen from a broad perspective.
  • Players in mid-game, diving to catch a ball, or celebrating a win are seen in action shots.
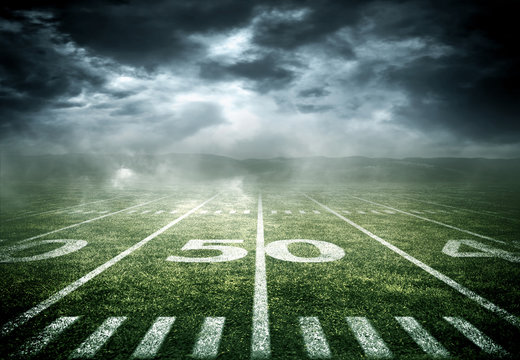
    pictures of a football field taken from above or close-ups of the ball in play.

3. Backgrounds Focused on the Player
Player-focused backdrops are an excellent option for fans who have a favorite player. These backgrounds capture the spirit of individual talent and establish a personal connection with the athlete, whether they are a rising star or a legend like Lionel Messi or Cristiano Ronaldo.

How to make player-focused backdrops that stand out:

  • Make use of shots that are full of activity and showcase the player at their best, such when they score a goal or make a spectacular pass.
  • To put the player at the center of the design, try using creative effects like a blurred background.
  • Add statements made by the athlete or significant events throughout their career.

4. Football’s Past and Significant Events
Football has a long history, and supporters frequently commemorate important events like league titles, World Cup triumphs, or the retirement of a favorite star. Football backgrounds that are historical or milestone-focused honor the game’s most iconic moments.

Inspiration for historical backdrop creation:

  • Include pictures of well-known football events, including memorable goals or renowned parties.
  • To evoke a sense of nostalgia, use retro or vintage effects.
  • To mark significant occasions, such as a team’s championship win or a World Cup victory, add wording.

Designs for Football Backgrounds for Various Events

Football backgrounds can be customized for special occasions in addition to everyday use. The appropriate backdrop may enhance the significance of any event, be it a team anniversary, a match day, or a seasonal celebration.

1. Themes for Match Days
Nothing raises a football fan’s heart rate like game day. It’s a day of enthusiasm, unity, and anticipation. Creating a backdrop to commemorate match day can encourage excitement among spectators and get everyone into the game mood.

Suggestions for backgrounds on match days:

  • With a clock indicating the approaching game time, create a countdown theme.
  • Show the opposing teams with their players or logos in the forefront.
  • Make use of vivid hues that capture the spirit of the stadium and crowd.

2. Special Events (Championships, Anniversaries)
Whether it’s the anniversary of a significant victory, a championship triumph, or a player’s milestone, every club has its time to shine. One excellent method to commemorate these important occasions is with a commemorative background.

Making backgrounds for important occasions:

  • Use a background that features the trophy, pyrotechnics, and team jubilation to commemorate a team’s championship win.
  • Write something like “10th Anniversary of the 2015 Premier League Victory” that alludes to the event.
  • To create a joyous atmosphere, combine celebratory visuals with the team’s recognizable insignia.

3. Designs for the Seasons
In various seasons, football supporters also want to display their team pride. Designing a background according to the season—whether it’s winter, spring, summer, or fall—is a terrific method to keep your background current and appealing.

Ideas for a seasonal football backdrop:

  • Fall: Use cooler colors, a football field with golden hues, and autumn foliage.
  • Winter: Add a Christmas tree with football-themed decorations or use snowy landscapes with a stadium in the background.
  • Spring/Summer: Make use of more vivid hues and pictures of stadiums that are open and spectators taking in the sun while watching the game.

4. Individual Festivities
In addition, fans could want to make backdrops for their own football-related achievements, such winning a fantasy football league, playing for a local league team, or remembering a special match.

Background ideas for personal celebrations:

  • Make use of a collage of images from your league’s championship victory or individual accomplishments.
  • Add a customized message, like “Fantasy Football Champion 2025.”
  • Display unique designs that incorporate your winning moment with team images.

Where to Look for Backgrounds on Football

Even if there are many football background designs on the internet, it’s crucial to know where to hunt for premium, free, or high-quality designs.

1. Free Materials
There are several websites that provide free football backdrops for download if you’re on a tight budget. These websites provide a range of themes, such as fan art, action photos, and team logos.

Several well-liked free background resources are as follows:

  • For high-quality, royalty-free photos, use Unsplash.
  • Pexels (for free football-themed stock pictures)
  • Free sports wallpapers are available from WallpaperAccess and Wallpaper Cave.

2. High-End Designs
Premium designs are offered for sale to individuals who are prepared to spend money on a more distinctive and high-resolution background. Exclusive, personalized football backgrounds are available on websites like Etsy, DeviantArt, and design markets like Envato Elements.

Where to get high-end designs:

  • Look for personalized, hand-drawn football backgrounds on Etsy.
  • Envato Elements is a premium design file subscription service.
  • For high-quality sports imagery and graphic design, choose Adobe Stock or Shutterstock.

3. Customizing Your Own Background
Make your own football background if you want it to be really unique. Graphic design software and internet resources can be used to create the ideal image that conveys your passion for the game.

Resources for making football backgrounds:

  • Canva: Using templates, graphics, and text, Canva allows you to create personalized football backgrounds. It’s simple to use and perfect for novices.
  • Photoshop: This program gives users with more experience total control over design elements, enabling them to work with effects, colors, and pictures.
  • GIMP: A free substitute for Photoshop, GIMP provides robust capabilities for photo editing and graphic design.

How to Make Use of Football Backgrounds

It’s time to use your ideal football background once you’ve chosen or made it. Here are some pointers for utilizing your football designs on various platforms.

1. Social media
You may use football backdrops to improve your social media accounts on Facebook, Instagram, and Twitter. Ensure that the dimensions of your photographs are suitable for every platform.

How to make football backdrops look their best on social media:

  • Facebook: Make sure your profile photo is square (180×180 pixels) and your cover photo is wide (820×312 pixels).
  • Instagram: For your Stories, use square photos (1080x1080px) or vertical photos (1080x1920px).
  • Twitter: To display the entire design, create a 1500x500px header picture.

2. Wallpapers for Mobile & Desktop
Football backgrounds make excellent desktop or phone wallpapers. Make sure to adjust the image’s size to accommodate various screen sizes.

Suggestions for desktop wallpaper:

  • for Full HD screens, 1920×1080 pixels.
  • 2560 x 1440 pixels for 2K displays.

Tips for mobile wallpaper:

Because photographs may be cropped on smaller displays, pick ones with minimal text or information in the corners.

3. Designs for Blogs and Websites
If you have a football-related blog or website, incorporating a football background into the layout of your website might give it a fun, sports-themed look. Background photos can be incorporated into your site’s design elements or used as header or banner graphics.

Design Trends for Football Backgrounds

Like any design, football backgrounds change throughout time. The designs of today are more dynamic and engaging than in the past. Among the new developments in football background design are:

  • Simple, clean designs that highlight important components, like logos or well-known players, are known as minimalism.
  • Digital Art & Animation: 3D patterns and moving backdrops give your fan gear a high-tech, futuristic vibe.
  • Football backgrounds using augmented reality (AR) allow you to engage with your favorite players or teams in new ways.

For football fans to express their passion, connect with the game, and enjoy the thrill of the sport, they must have a football background. The correct background can improve your digital experience, regardless of whether you select a team-specific design, a historical event, or a unique creation.

To make a genuinely unique football background, don’t forget to experiment with customization options and try out various design styles and circumstances. Whether you’re celebrating a big victory or preparing for game day, having a football background keeps you involved in the game no matter where you are.

For further football-related articles, design ideas, and advice, go to QuickNewsFeed.com. Remember to leave a comment below or share your favorite football background designs with us on social media!

FAQ: Comprehensive Guide to Football History

1. What are the backgrounds of football players?
Utilized as wallpapers, social media headers, or profile pictures, football backdrops are digital representations of fandom that include team logos, players, or football-related topics.

2. Where can I acquire background information on football?
Football backdrops can be found on free websites like Unsplash and Pexels, on paid platforms like Etsy or Envato Elements, or made yourself with Canva or Photoshop.

3. How can I make my own background for football?
Choose a theme, add unique components, and make sure the background is the right size for your platform or device by using design software like Canva or Photoshop.

4. What are the ideal football background dimensions?
PC: 1920 x 1080 pixels.
Mobile: 1920×1080 pixels.
Social media: Twitter (1500x500px), Instagram (1080x1080px), and Facebook (820x312px).

5. Is it okay to utilize football backgrounds for business?
If you intend to utilize photographs for commercial purposes, make sure you choose licensed or royalty-free images. Commercial-use licenses are available on websites such as Unsplash and Pexels.

Sports News:-

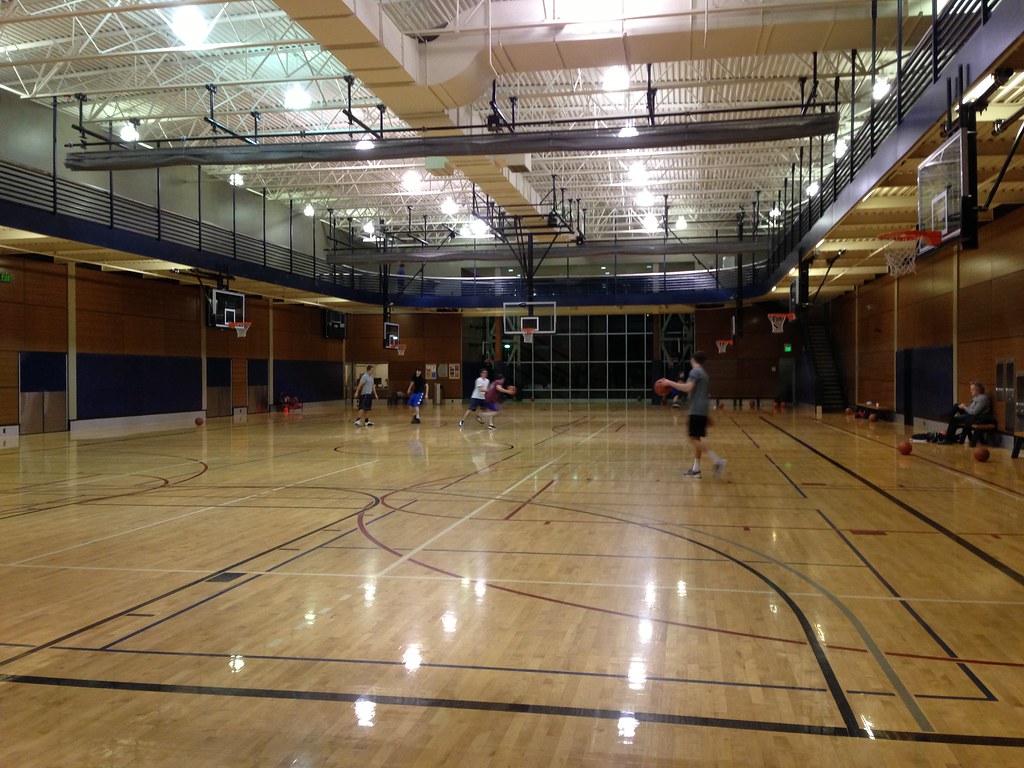
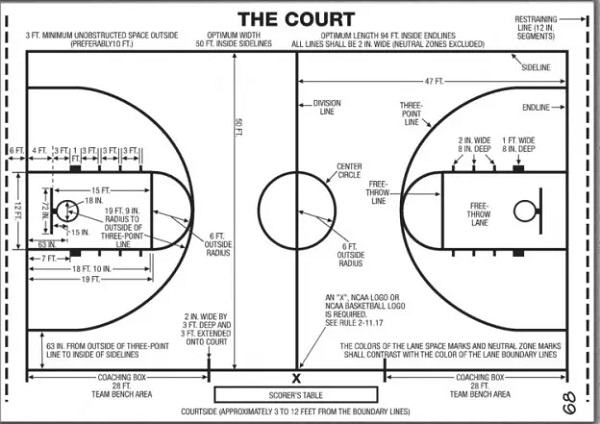
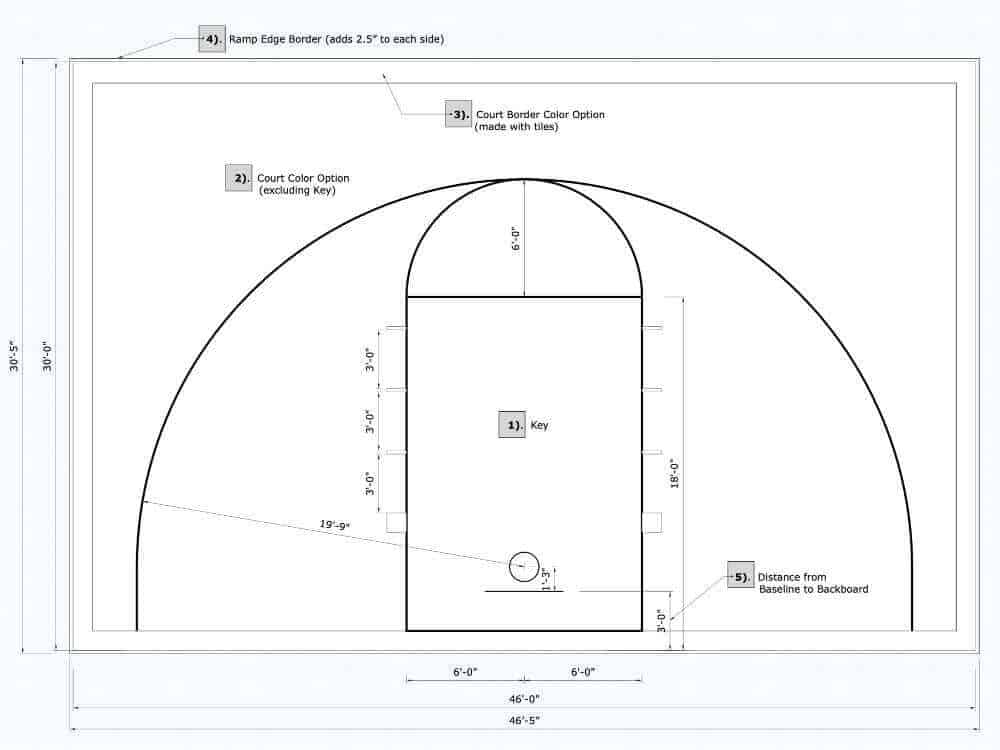
You may also like to read:- How to Build the Ultimate Home Basketball Court: Design, Costs, and Tips

You may also like to read:- How much does it cost to build a tennis court?


Football Squares Template: How to Create and Play for Your Next Game Day

0

A timeless and thrilling game, Football Squares makes any game day enjoyable and captivating. Football Squares is an easy yet exciting method to get everyone engaged, whether with friends to watch your favorite team play or throwing a Super Bowl party. This page will explain Football Squares, how to make your template, and the game’s rules. We’ll also offer free materials and hosting advice to improve your game day!

Football Squares: What Are They?

Often played during football games, Football Squares, sometimes known as box pool, is a game of chance. Participants select squares from a grid of 100 in the game, and they must hope that the scores after each quarter of the game match the square they selected.

This is how it operates:

  • Ten rows and ten columns are used to make a grid with 100 squares.
  • The rows are given to one team, and the columns to the other.
  • Numbers 0 through 9 are assigned randomly to the rows and columns once the squares have been filled.
  • If the final number on each team’s score matches the numbers in their square, the players win.
  • This game is ideal for everyone, from casual viewers to ardent football fans, as it doesn’t require any particular abilities or knowledge.

How to Make a Template for Football Squares

Making a Football Squares template is easy and may be done in a few different ways. This is a detailed guide:

Step 1: Sketch the grid

Make a grid that is 10 by 10 and has 100 squares.
This can be done manually on a chalkboard, whiteboard, or even a huge piece of paper.

Step 2: Put labels on the columns and rows

Put one football squad in the columns and the other in the rows.
Leave the top-left corner empty and write the team names along the leftmost row and the topmost column.

Step 3: Get Ready for the Data

To maintain fairness, keep the numbers 0 through 9 empty until every square is filled. We’ll add these figures later.

Step 4: Make Use of Digital Resources

You can download templates and use free online tools if you want a more professional appearance. To create a tidy grid, you can also utilize programs like Google Sheets or Microsoft Excel. This is particularly useful when holding a virtual gaming day or sharing the grid online.

Methods for Completing the Squares

It’s time to complete the squares on your template. Here’s how:

  • Invite People to Participate: assemble coworkers, friends, or relatives who are interested in playing. Any number of squares may be purchased or claimed by any individual.
  • Optional: Decide on a price per square. Give each square a price, such as $1 or $5, if you’re playing for rewards. As a result, a prize fund is created for the winners.
  • Squares of Claim: Let participants select their squares or distribute them at random. In the squares of their choice, players can write their names or initials.
  • Pro Tip: Have participants choose their squares using a digital grid or sign-up form to prevent conflicts.

How Numbers Are Assigned

One important step is to assign numbers to the rows and columns. To maintain the fairness of the game, it is crucial that this be done at random. Take these actions:

After every square has been filled, write the numbers 0 through 9 on little pieces of paper, then randomly select them for the rows and columns.
In the upper row and the leftmost column, write the numbers that were drawn.
Regardless of the squares they select, everyone has an identical chance of winning because to the randomization.

How Football Squares Are Played

Football Squares is a simple game that doesn’t require any prior football expertise. This is how it operates:

Configuring the Game:

After the game starts, keep note of the score at the conclusion of each quarter (or, if your regulations allow it, the halftime and final score).
To find the winning square, use the final number of each team’s score.
For instance:

The winning square is the one that crosses at 1 (the final digit of 21) for the row and 7 (the final digit of 17) for the column if the score at the end of the first quarter is 21–17.
Choose the Winners:

At the conclusion of each quarter, half, or game, you can give out awards. Prior to the game starting, decide on the payout structure.

Possible Modifications:

Reverse Payouts: Give out prizes to the squares that come close to winning (one number off, for example).
Bonus Squares: Set aside specific squares as “bonus” in order to receive exclusive rewards.

Football Squares: Guidelines and Protocols

Set some fundamental guidelines to ensure the game is enjoyable and equitable:

  • Transparency: Whether online or in person, make sure everyone can see the grid.
  • Decide on Payouts: Prior to the game, decide on payout amounts or reward structures.
  • Respect Choices: A square cannot be altered after it has been selected.
  • Keep It Light: Keep in mind that the purpose of this game of chance is amusement.

Some Advice for Organizing a Football Squares Match

It takes preparation to host a successful Football Squares game. Here are some pointers:

Establish a Joyous Ambience:

Use football-themed accessories, banners, and team colors to adorn your area.
Provide drinks and snacks to maintain a positive attitude.

Involve Everyone:

To keep the excitement going, announce the winners at the end of each quarter.
Regardless of their level of game understanding, encourage guests to clap for their squares.

Provide Rewards:

For quarter winners, think about offering modest rewards like entertaining products, team gear, or gift cards.

Get Ready for Virtual Gaming:

Use a digital template and distribute it via shared documents or screen sharing if you’re hosting online.

Free Templates for Football Squares

Use free Football Squares templates to save time. You can download, print, or alter these pre-made grid templates. Numerous websites provide free resources; some even provide digital tools for number and square assignment.

Why Game Day Is Ideal for Football Squares

Football Squares serves as a social tool in addition to being a game. It is a favorite for game day get-togethers because of its simplicity and the excitement of random chance. Every quarter is made more exciting with Football Squares, regardless of whether you’re an avid fan or you’re just there for the food and entertainment.

Frequently Ask Questions

1. How Can Football Squares Be Played Without Betting?
By using prizes rather than monetary payouts, you can play Football Squares without placing a wager. For instance:

Provide enjoyable incentives to quarter winners, such as little awards, team items, or snacks.
Make it fun by giving the winners the chance to boast.
Because of this strategy, even children and non-gamblers can enjoy the game.

2. Can Football Squares Be Played Online?
Yes, playing Football Squares online is simple! Here’s how:

Utilize digital templates in programs such as Excel, Google Sheets, and online pool management systems.
Participants can claim squares from a distance by sharing the grid via email or a shared link.
To assign numbers to rows and columns, use random number generators.

3. How Do Football Squares Payouts Operate?
Football Squares payouts are usually split between the victors at the conclusion of the game or each quarter. The following is a typical payout structure:

Winner of the First Quarter: 20% of the total prize money.
Winner of the Second Quarter: 20%.
Winner for the third quarter: 20%.
Winner of the Final Score: 40%.
These percentages can be changed, and awards can be given in lieu of cash.

4. What Takes Place When No Square Is Claimed?
You have several choices if any squares are left unclaimed:

No one wins if the score matches an empty square, therefore leave such spaces blank.
Either give the organizer the squares or donate the profits to a worthy cause.
Assign the unused squares to participants at random.

5. How Are Football Square Numbers Assigned?
Once every square has been claimed, rows and columns are randomly allocated numbers 0 through 9. Fairness and unpredictability are thus guaranteed. You can use a random number generator, draw numbers out of a hat, or have an impartial person choose the numbers.

6. Is It Possible to Play Football Squares for Any Sport?
Of course! Basketball, soccer, hockey, and other sports with scoring systems can all use Football Squares. Simply modify the regulations to conform to the format of the game (for example, by substituting halftime scores for quarters).

7. What Are Football Squares in Reverse?
Players whose numbers are the inverse of the winning score are rewarded in Reverse Football Squares. For example, the square at 7 (rows) and 1 (columns) would be the reverse winner if the winning numbers were 1 (rows) and 7 (columns). There are more opportunities to win and more excitement with this variation.

8. What Takes Place When a Game Is Tied?
The square that corresponds to the tied numbers wins if there is a tie at the end of the game. The winning square, for instance, is the one where 1 crosses with 1 if the score is 21–21.

9. How Are Football Squares Maintained?
To keep things equitable:

Only assign numbers once every square has been filled.
Make use of transparent randomization techniques, such as certified random number generators or live draws.
Before the game begins, distribute the finished grid to every player.

10. The Maximum Number of Players for Football Squares?
If each player claims one tile, a maximum of 100 players may participate. The game becomes more competitive if there are fewer players since they can claim more than one square.


A fun and simple method to improve your next game day is to make and play Football Squares. Everyone, from ardent supporters to casual onlookers, can join in the thrill with a little planning.

Are you prepared to begin? Invite your pals, download our Football Squares design for free, and start having fun! It only got much better on game day.

You can visit Quick News Feed to stay informed with real-time news and trending stories from various categories.

White & Pink Cricket Ball, What’s The Difference?

0

Cricket is a traditional sport that adapts to accommodate new audiences and problems. Introducing white and pink cricket balls, each suited for certain purposes and match forms was a game-changing innovation. While red balls have traditionally dominated cricket, the introduction of white and pink balls has altered how the game is played, especially in changing lighting circumstances. So, what distinguishes these balls? Let us investigate the changes in design, behavior, and impact on the game. Also Uncover all the exciting details about the ICC Champions Trophy 2025, including schedules, participating teams, and more.

Cricket Balls: Their Evolution

The cricket ball has changed dramatically over time. Initially, red cricket balls were the standard, being used in all game styles. Their durability and visibility in daylight made them a Test cricket fixture.

However, the emergence of limited-overs forms such as ODIs and T20s necessitated the development of a ball that was more suited to artificial illumination and shorter game durations, resulting in the development of the white cricket ball. Later, as day-night Test matches became more popular, the pink ball was developed to overcome the issues of visibility at dusk and under floodlights.

White Cricket Ball: Characteristics and Usage Design and Construction

The white cricket ball is similar in size and weight to the classic red ball, but differs dramatically in color and surface polish. Its dazzling white hue comes from dyeing and a unique lacquer coating that improves visibility during night matches. The white ball’s seams are often black, creating a stark contrast against its surface that allows players and spectators to track its movement.

White & Pink Cricket Ball, What's The Difference?
Close-up of a cricket ball

Purpose
The white cricket ball is only used in limited-overs cricket, such as One Day Internationals (ODIs) and Twenty20 Internationals (T20Is). It is preferred for these formats because it is very visible under floodlights, which are commonly used in evening matches.

Behavior
One of the white ball’s distinguishing features is its swing. Initially, the ball swings beautifully, but this effect fades faster than with the red ball due to less wear on its smooth surface. The white lacquer fades unevenly, making it difficult for bowlers to maintain reverse swing. Furthermore, white balls tend to lose their shine quicker, which affects their grip and movement.

Pink Cricket Ball: Characteristics and Applications Design and Construction

In terms of design, the pink cricket ball resembles both the red and white balls. Its pink dye is chosen to improve visibility during twilight hours and under floodlights in day-night test matches. To address the red ball’s low-light visibility concerns, the pink ball has extra layers of lacquer, giving it a sleek and glossy appearance. To contrast with its dazzling surface, the pink ball’s seams are usually black or dark green. These seams are crucial for bowlers’ swing and spin.

White & Pink Cricket Ball, What's The Difference?
CRICKETBALLPINK

Purpose
The pink cricket ball was created specifically for day-night Test matches, in which natural light transitions to artificial lighting. Its brilliant color allows players and spectators to track the ball’s movement even in low-light settings.

Behavior

The pink ball behaves differently than the red and white balls. Because of its additional lacquer, it swings more than the red ball and frequently acts unexpectedly under lights, adding another layer of difficulty for batters. However, the added coating makes it significantly harder, resulting in faster wear on the bat and fielding equipment.

Key Differences Between White and Pink Balls

The white and pink cricket balls are tailored to specific match forms and lighting situations. While they have some architectural similarities, their main differences include color, behavior, longevity, and impact on the game. This is a full comparison:

1. Color & Visibility
White Balls:

The bright white color improves visibility under artificial lighting during ODIs and T20Is.
Can rapidly become dirty on grassy or dusty outfields, reducing vision over time.

Pink Balls:

Vivid pink increases visibility during day-night Test matches, particularly at dusk and under floodlights.
Due to additional layers of lacquer, it retains its brightness for a longer period than white balls.

2. Swing and Seam Movement: White Ball

Swings well in the first few overs, but loses swing quickly as the lacquer fades.
Seam visibility deteriorates over time, making it difficult for bowlers to extract movement.

Pink Balls:

The extra lacquer coating and sharper seam provide a more pronounced swing.
Maintains steady movement even under lighting, posing additional obstacles for batters.

3. Durability: White Ball.

Designed for shorter formats in which durability is less important.
The ball’s surface wears out faster, which affects its behavior.

Pink Balls:

Designed to withstand longer innings in day-night Tests, requiring more coatings of lacquer for protection.
More durable, preserving its shine and swing properties for longer periods.

4. The impact on bowlers:

The white ball provides restricted swing chances, necessitating greater accuracy and variation.
The pink ball has more swing, especially under lights, allowing bowlers to take advantage of the conditions more effectively.

For bats:

White balls are easy to monitor at first, but they might be difficult to discern if soiled.
Pink balls are difficult to read under lights due to their swing and speed, requiring greater concentration and expertise.

5. Match Format Suitability: White Ball

Only used in limited-overs cricket (ODI and T20Is).
Ideal for shorter forms with varying lighting circumstances during evening contests.

Pink Balls:

Designed specifically for day/night Test matches.
Long-term play in a variety of lighting settings is highly effective.

6. Outfield Impact: White Ball.

Color and sparkle fade quickly in grassy or muddy outfields.
To ensure visibility during matches, regular replenishment is required.

Pink Balls:

The added lacquer helps resist wear and filth, resulting in superior performance over time.

7. Audience and Viewer Experience.
White Balls:

During fast-paced limited-overs games, spectators can see more clearly.
Television broadcasts benefit from its strong visibility under lighting.

Pink Balls:

The improved visibility in day-night tests makes it suited for extended viewing sessions.
Provides an interesting spectacle, especially after dusk.

Color

  • White ball: bright white.
  • Pink Ball: Vivid pink. Formats

Formats

  • White ball: Used for ODIs and T20Is.
  • Pink Ball: Designed for day-night test matches.

Visibility

  • White Ball: Highly apparent under artificial lighting.
  • Pink Ball: Improved visibility at dusk and under floodlights.

Durability

  • White ball wears down faster and loses its sheen rapidly.
  • Pink Ball: Increased durability due to numerous layers of lacquer.

Swing

  • White Ball: As the lacquer fades, the swing becomes less effective.
  • Pink Ball: Improves swing, especially under lighting.

Seam

  • White Ball: The seam becomes less noticeable with time.
  • Pink Ball: A sharp and conspicuous seam for longer wear.

Outfield Impact

  • White Ball: Gets soiled rapidly on grassy or dusty outfields.
  • Pink Ball: Keeps its luster and color longer.

Bowling Impact

  • White Ball: After the first overs, bowlers get little swing opportunities.
  • Pink Ball: Bowlers profit from repeated swings and movements.

Batting Impact

  • White ball is easier to track at first, but becomes more difficult as it gets dirty.
  • Pink Ball: The pronounced swing makes it more difficult for batters to hit under lights.

Lacquer

  • White Ball: A minimalist lacquer for short-duration media.
  • Pink Ball: Additional lacquer for improved performance in long bouts.

Audience Appeal

  • White ball is ideal for fast-paced limited-overs cricket.
  • Pink Ball: Offers a visually appealing experience for day and night tests.

How are cricket balls made?

Cricket balls are precisely made to suit weight, size, and performance specifications. The manufacturing process is multi-step, blending traditional artistry with modern technology to create a ball that can survive the demands of competitive play. Here’s a step-by-step tutorial to how cricket balls are made:

1. Materials Used
Cricket balls are mostly made from the following materials:

  • Cork: Forms the core of the ball, providing toughness and bounce.
  • Woolen yarn is wrapped around the cork to provide weight and stability.
  • Leather: Used for the outside cover to provide durability and smoothness.
  • Lacquer is a lustrous coating applied to leather for protection and improved performance.

2. The Core
The process starts at the core.

  • A little cork sphere, often obtained from the bark of cork oak trees, serves as the cricket ball’s basis.
  • The cork is squeezed under tremendous pressure to create a robust, sturdy core capable of absorbing impact and providing constant bounce.

3. Wrapping with woolen yarn
The cork core is securely coiled with multiple layers of high-quality woolen yarn.
The yarn is twisted under tension to form a uniform shape and add weight and hardness to the ball.
This step is crucial for maintaining the ball’s balance and durability throughout play.

4. Leather cover
Cutting and Shaping
High-grade leather is cut into exact forms, usually two halves or four quarters, depending on the manufacturing procedure.
These leather pieces are dyed (red, white, or pink) and treated to get the appropriate color and quality.
Stitching
The leather pieces are sewn around the core with waxed thread.
Most professional-grade balls have 60-80 hand-sewn stitches to ensure the seam is prominent and durable.
The seam not only holds the ball together, but it also helps bowlers get swing and spin.

5. Laquering and Polishing
After stitching the leather cover, layers of lacquer are applied to the ball.
The lacquer increases the ball’s brilliance, improves visibility, and preserves the leather from wear and strain.
Pink balls have additional coats of lacquer added to ensure longevity under floodlights.

6. Shape and Testing
The ball is placed in a shaping press to get a precisely round form.
To comply with international standards, each ball is checked for weight, size, and hardness.
Men’s cricket weights range from 155.9 to 163 grams.
Circumference: 22.4–22.9 cm.
Balls that have passed these testing are polished and stamped with the manufacturer’s emblem.

7. Category
Cricket balls are classed according to their intended purpose.

  • Red balls are mostly used in Test matches.
  • White balls: Used in limited-overs cricket (ODIs and T20s).
  • Pink balls are used for day/night Test matches.

Controversies and Challenges

Both white and pink cricket balls have received their fair share of criticism and objections.

White Ball Issues: One of the main issues about white balls is their tendency to become dirty rapidly, especially on grassy outfields, which might impair visibility. Furthermore, spinners frequently find it difficult to hold the white ball due to its smooth lacquered surface.

Pink Ball Challenges: The pink ball has aroused controversy about its performance in various conditions. In some circumstances, hitters struggle to discern the ball’s movement under lights, and bowlers struggle to retain control due to the ball’s hardness. Critics have also questioned its capacity to withstand long innings.

Why Are Pink and White Balls Important in Modern Cricket?

The introduction of pink and white cricket balls exemplifies cricket’s attempt to adapt to changing times and viewers. Here is why they are important:

Catering to Audiences: Because of the pink and white balls, day-night matches draw greater audiences and television viewers, making the sport more accessible to followers all around the world.
Technological Advancements: The innovative design of cricket balls reflects the sport’s commitment to adapting with the times while maintaining its essence.
Cricket has expanded its global popularity by introducing new formats and equipment, breaking down conventional barriers.

The white and pink cricket balls have transformed the game, each serving a distinct role and adding new dynamics to the game. While the white ball dominates limited-overs cricket, the pink ball has made a name for itself in day-night Tests. Their variations in design, behavior, and impact on gameplay demonstrate the sport’s versatility and evolution.

As cricket continues to innovate, one can only imagine what the next generation of the cricket ball will look like. Regardless of the answer, the sport’s innovative spirit ensures that it will continue to captivate both players and viewers. “Stay updated with the latest news, trends, and insights by visiting QuickNewsFeed.com!”

How to Build an Outdoor Basketball Court: Step-by-Step Guide and Costs

0

Building your outdoor basketball court can be a dream come true for sports fans, families, and anybody wishing to add a fun, functional addition to their backyard. Whether you’re planning informal games with friends or rigorous practice sessions, building a basketball court provides numerous advantages. In this detailed step-by-step tutorial, we’ll go over everything you need to know about creating an outdoor basketball court, from planning and design to pricing and maintenance.

How to Build an Outdoor Basketball Court: Step-by-Step Guide and Costs

1. Planning and Designing

Before you start building your outdoor basketball court, you should plan and design the area to lay a solid foundation.

Space requirements
A conventional full-size basketball court is 94 feet long and 50 feet broad (28.65 meters by 15.24 meters). If room is limited, you might go for a half-court, which is 47 feet long and 50 feet broad (14.3 meters by 15.24 meters). In most circumstances, the lower court size will allow for an enjoyable playing experience.

Choosing a Location
Your basketball court’s location is important for its usefulness and visual appeal. Here are some important variables to consider:

Level Ground: Select a flat place to check that the surface is level and suitable for gaming.
Sunlight and Shade: Consider how the sun will impact your court. Ideally, it should be shaded in the summer to prevent warmth yet well-lit in the evenings.
Drainage: Ensure that the location has enough drainage. Poor drainage can cause water to collect on the court, damaging it over time.

Design options
Your court’s design will be determined by both your available space and personal preferences.

Half-court vs. full-court: A half-court is adequate for smaller places, but a full-court is preferable if you have enough space.
Hoop Height: Adjustable hoops are ideal if you have younger players or want to accommodate varying skill levels.
Consider adding benches, a scoreboard, or even bleachers to improve convenience and comfort.

Materials Required

Once you’ve decided on a design and a location, you’ll need to acquire the materials for your basketball court.

Surface materials
The surface of your court is one of the most critical factors to think about. There are three main choices:

Concrete is the most commonly used material for outdoor basketball courts due to its durability and long-lasting nature. It creates a smooth and consistent playing surface.
Asphalt is another cost-effective and long-lasting choice. While initially smooth, it may develop fractures over time and require resurfacing.
Modular Flooring: Plastic or rubber interlocking tiles are becoming increasingly popular for building your own basketball court. These are easier to install and maintain, but they are generally more expensive.

The Hoop System
A high-quality basketball hoop is vital for any court. You can select from two primary types:

In-ground Systems: These are permanent systems that offer more stability and longevity.
Portable Systems: Portable hoops are an excellent solution if you want flexibility and do not want to make permanent improvements to your property.
Fencing
Installing a fence around your court can help keep the basketball within bounds while also adding an element of safety. It will help prevent balls from entering nearby properties and keep the court secure.

Proper illumination allows you to enjoy your court even after the sun sets. LED floodlights are energy-efficient and provide superb lighting. To ensure adequate illumination coverage, put poles and lights strategically around the court.

“Discover everything you need to know about basketball hoop heights in our detailed guide here: How High Is a Basketball Hoop?.”


Additional accessories.
Basketball nets, court markings, and maybe a scoreboard to keep score are also required. Court markings can be painted directly onto the surface or applied using vinyl decals, which are simple to use and long-lasting.

Setting up the site

Preparing the land is an important phase in the construction process. The goal is to create a flat, clean surface that is ideal for playing.

Clear the land by removing barriers like rocks, trees, and rubbish from the court area. To clear greater impediments, you may need to employ heavy machinery, such as a backhoe or bulldozer.

Leveling the ground
After clearing the terrain, you will need to level it. This is especially critical if you are constructing a full court. Uneven surfaces can disrupt gaming and pose safety risks. Use a laser level or a long, straight plank to ensure that the ground is perfectly level.

Drainage Considerations:
Proper drainage is critical to the integrity of your court. If your property has poor drainage, you may need to install a French drain or create a modest slope on the surface to promote water runoff. This will help to keep water from pooling on the court and creating damage over time.

Building the Courthouse

After preparing the land, you may begin building your outdoor basketball court.

Installing the surface
Whether you’re using concrete, asphalt, or modular flooring, the installation process entails laying the material and making sure it’s smooth and even. For concrete or asphalt, you may need to engage professionals to pour the surface. Make sure the surface is gently inclined to allow for water drainage.

Setting up the hoop
Once the surface has been prepared, the hoop can be installed. If you use an in-ground system, you must dig a hole deep enough to hold the pole’s base. For a portable system, follow the assembly and setup instructions provided by the manufacturer.

Painting the court

Marking the court is critical for gaming. To build the key, three-point line, free-throw line, and half-court line, apply high-quality outdoor paint. Measure carefully to ensure that the markings are correct and fall within the measurements of a standard basketball court.

 Optional Enhancements:

You may upgrade your outdoor basketball court in a variety of ways, depending on your budget and tastes.

Installation of Court Lighting.
If you intend to play at night, install court lights. You’ll have to buy high-quality LED lights, poles, and wiring. Ensure that the lights are positioned such that they give uniform coverage across the court.

Adding fence or backboard support.
Consider building a fence or backboard support for additional safety and to prevent the ball from rebounding into other places. This will also assist define your court’s limits and improve its overall appearance.

landscaping around the court
Consider adding landscaping items around the court’s perimeter, such as bushes, trees, or ornamental pebbles, to improve its appearance. These features can give a refined appearance while also offering shade and privacy.

Cost and Budgeting

Building an outdoor basketball court requires an investment, but it is a worthwhile one. Here’s an overview of how much you may expect to spend:

Cost breakdown
A full-size court with a concrete surface costs $5,000 to $10,000.
Asphalt surface: $4,000 to $8,000.
Modular flooring costs between $10,000 and $15,000.
Basketball hoop prices range from $200 to $2,500, depending on the kind.
Lighting system: $1,000 to $5,000.
Fencing prices range from $2,000 to $5,000.
Court marking and accessories cost $500 to $1,000.

Labor costs
If you hire specialists to do things like pour concrete, level the ground, or install lights, labor costs can range from $2,000 to $8,000, depending on the complexity of the job.

Long-term maintenance
Over time, your court will require upkeep, such as resurfacing or repainting. Every 5-10 years, set up $1,000 to $3,000 for maintenance.

Care and Longevity

Regular maintenance is required to keep your basketball court in good working order.

Cleaning the court
To avoid dirt buildup, sweep trash away on a regular basis and wash the surface with a hose. Avoid applying aggressive chemicals that may harm the surface.

Repairs and maintenance
Cracks in the surface may occur over time, particularly in concrete or asphalt. Seal the cracks with the proper filler or pay a professional to resurface the court as needed.

Seasonal Considerations
In colder climates, it is critical to shield the court from snow and ice throughout the winter. To minimize causing surface damage, use a snow shovel instead of a plow.

Do-It-Yourself versus Professional Construction

While creating a basketball court can be a satisfying DIY job, you should consider whether it’s the best option for you. While DIY can save money, it may also take a significant amount of time and effort. Professional contractors, on the other hand, will complete the task more quickly and to a higher standard, though they can be costly.

Benefits of DIY construction include lower labor expenses and personal satisfaction.
Cons: Time-consuming; necessitates specific knowledge and tools.
Professional Construction offers high-quality outcomes, speedier installation, and less effort on your part.
Cons: Higher labor fees.

Legal Considerations and Permits

Before constructing an outdoor basketball court, check your local construction and zoning restrictions. A permit may be required if you are building a permanent construction or installing lighting. It is critical to ensure that your project conforms with local building codes to avoid fines or having to make changes later.

Building an outdoor basketball court is a substantial investment, but it pays off in the long run with increased physical activity, entertainment, and property value. Follow this step-by-step guide to build a high-quality court that matches your goals and fits your budget. From design and material selection to installation and maintenance, every step is critical to ensuring that your basketball court lasts for many years. Start today and experience the pleasure of shooting hoops in your own backyard!

This expanded version includes extra parts on DIY vs. professional construction and legal considerations, making it a more full and comprehensive advice for your readers. The article is still SEO-optimized to increase its search engine rankings.

Frequently Asked Questions (FAQ) About Building an Outdoor Basketball Court

1. What does it cost to install an outdoor basketball court?
The cost of constructing an outdoor basketball court varies depending on a number of factors, including the materials chosen, the size of the court, and if expert installation is required. On the average:

A full-size court’s concrete surface costs $5,000 to $10,000.
Asphalt surface: $4,000-$8,000.
The cost of modular flooring is between $10,000 and $15,000. A basketball hoop ($200 – $2,500), lighting system ($1,000 – $5,000), and fencing ($2,000 – $5,000) are all possible extras.

2. What is the ideal surface for an outdoor basketball court?
The ideal surface for an outdoor basketball court is determined by your budget and preferences.

Concrete is the most robust and long-lasting alternative, with a smooth playing surface, but it can be expensive.
Asphalt is a less expensive option, but it may crack over time and require care.
Modular flooring constructed from plastic or rubber tiles allows easy installation and maintenance, although it is generally more expensive than asphalt.

3. Can I construct a basketball court on a slanted surface?
While a flat surface is preferable for a basketball court, modest slopes are manageable with sufficient preparation. You may need to level the terrain with excavation and fill materials to provide a smooth surface for consistent gaming. A competent contractor can assist with grading the land if necessary.

4. Will I need a permission to install an outside basketball court?
In some regions, a permission is required to establish an outdoor basketball court, especially if permanent amenities such as lights or fence are included. Check with your local zoning agency or building department to ensure that you follow local regulations and receive any necessary permissions.

5. How long does it take to complete an outdoor basketball court?
The construction timeline is determined by elements such as court size, installation difficulty, and whether professionals are used. Building an outdoor basketball court usually takes a few weeks to a couple of months. DIY projects may take longer, depending on the amount and your skill level.

6. What style of hoop should I use for my outdoor court?
You can pick between an in-ground and portable hoop system.

In-ground systems are permanent and offer increased stability and durability, making them perfect for long-term use.
Portable devices are more versatile and may be moved around, but they may not provide the same level of stability as in-ground hoops.

“Stay updated with the latest news, trends, and guides on Quick News Feed.”

How to Make a Paper Football: Step-by-Step Guide for Kids and Adults

0

Are you trying to find something simple and enjoyable you and your kids can do together? Paper football is a classic, easy craft that adds excitement, healthy competition, and inventiveness to any gathering. Making paper footballs is a fun way to shake up the routine, whether you’re at home, in class, or with friends. It’s a cheap and easy way to get folks together for a little healthy competition. Creating it is fun, and the resulting game can be equally captivating.

How to Make a Paper Football: Step-by-Step Guide for Kids and Adults

How to Make a Paper Football: Step-by-Step Guide for Kids and Adults

How to Make a Paper Football: Step-by-Step Guide for Kids and Adults

We will guide you through the entire process of making your paper football, from folding to fixing it in place, in this extensive instruction. We’ll teach you the game’s rules and strategies once your paper football is ready, so that players of all ages may join in and enjoy themselves. Regardless of your level of experience, this simple craft and game provide the ideal balance of simplicity and excitement to liven up any informal get-together. Prepare to score, flip, and fold in this classic paper football game! Learn how to build the ultimate home basketball court with this comprehensive guide.

Why It’s Fun for People of All Ages to Make Paper Footballs

Making a paper football is more than simply making something cool; it’s a game that can unite friends and family. Paper football is a terrific way to connect and have fun, whether you’re an adult remembering the good old days of classroom competition or a child learning how to fold.

How to Make a Paper Football: Step-by-Step Guide for Kids and Adults

How to Make a Paper Football: Step-by-Step Guide for Kids and Adults

We’ll walk you through the process of creating a paper football, demonstrate how to play, and offer advice on how to make sure your paper football is long-lasting. So take out a piece of paper and let’s begin!

Materials You’ll Need to Make a Paper Football

Let’s review the resources you will need before we begin the crafting process. Fortunately, you don’t require much!

  • A sheet of paper (standard 8.5 x 11-inch printer paper is ideal, but feel free to try different sizes) is needed.

How to Make a Paper Football: Step-by-Step Guide for Kids and Adults

  • Scissors (optional; used for trimming when necessary)

How to Make a Paper Football: Step-by-Step Guide for Kids and Adults

  • To keep the football’s creases secure and unbroken, use tape or glue.

How to Make a Paper Football: Step-by-Step Guide for Kids and Adults

How to Make a Paper Football: Step-by-Step Guide for Kids and Adults

  • Pen or marker (optional; use it to decorate or customize your paper football)

How to Make a Paper Football: Step-by-Step Guide for Kids and Adults

Since you most likely already have everything you need at home, let’s get to the exciting part: folding!

Step-by-Step Guide: How to Make a Paper Football

Step 1: Lengthwise fold the paper in half.
First, bring the shorter sides of your paper together by folding it in half lengthwise. Making a long, narrow rectangle is aided by this step.

Pro Tip: Use a pencil or your finger to run over the edge of the fold to ensure it is crisp. The remaining procedures will be simpler if you fold it neatly!

Step 2: Fold One Edge Toward the Center
After making the first fold, fold one side of the paper in toward the center, starting at the top corner. Along the paper’s edge, you’re drawing a tiny triangle. In this step, the paper football’s characteristic shape will begin to take shape.

Step 3: Continue Folding the Paper into a Triangle
Fold the paper over itself again now. The paper will roll into a tighter triangle shape with each fold. To maintain a tidy and compact shape, keep rolling tightly.

To keep the triangle shape, make sure all of the folds are correctly aligned as you work. Your paper football is going to be more durable the tighter you roll!

Step 4: Secure the Paper Football
At the end of the rolling procedure, your paper football should resemble a tiny triangle. During the game, you will need to secure the edges to keep it together. Hold everything in place with a tiny piece of tape, or just press down to ensure that the folds stay together.

Step 5: Include Concluding Details
The exciting part is about to begin: designing your paper football! You can either keep it as is or add unique elements like a team logo, an amusing design, or even some quirky patterns with pens or markers. Create a fun and original paper football!

The Best Game for All Ages: How to Play Paper Football

How to Make a Paper Football: Step-by-Step Guide for Kids and Adults

You’ve created your paper football, then! What comes next? The game is about to begin! Paper football is the ideal pastime for children, teens, and adults alike because it is simple to learn and enjoyable to play.

  • Players: Two players are ideal for paper football, but if you want a bigger game, you can easily add more. Every player ought to have a football of their own, or if you’re feeling competitive, you may share one.
  • Setting your fingers or other things at the table’s edge creates the most basic goalposts. Pens, books, and other items on the table can also be used to make larger goalposts. To allow the paper football to pass through, make sure the goalposts are sufficiently wide.

How to Play

  • Players alternately use their fingers to flick the paper football across the table. By placing your fingers near the edge of the table, you can attempt to get the football through the goalposts.
  • Points are awarded to players each time they successfully flick the football through the goalposts. Players attempt to score by flipping in turn.
  • Getting the Points: Choose how many points need to be scored to win the game, such as five or ten. The winner of the game is the first participant to attain the predetermined point total.
  • Game Variations: By introducing new rules, such as requiring the ball to be flicked from a set distance or limiting flicking to specific fingers, you can also alter the game.

Pro Tip: You may build distinct zones on the table that give out different point values to add even more intrigue to the game. For instance, you may score extra points if you get the football through a particular area of the goalpost!

How to Create the Greatest Paper Football

Although creating a paper football is easy, follow these guidelines to make sure your football survives vigorous flicking action:

How to Make a Paper Football: Step-by-Step Guide for Kids and Adults


Use Thicker Paper: Although ordinary printer paper is OK, a football made of thicker cardstock will last longer. This guarantees that it won’t rip or deform after several games.

Make Tight, Even Folds: Your football will be more stable if you roll the paper tightly. To prevent any loose ends that can impact the game, make sure every fold is even and tight.

How to Make a Paper Football: Step-by-Step Guide for Kids and Adults

Try Different Sizes: To provide a different challenge to your game, try using different sizes of paper to make bigger or smaller versions of the football.

Advantages of Paper Football Play

How come paper football is such a great game? It continues to be a popular activity for people of all ages for the following reasons:

Ideal for Group events: This game is fantastic for gatherings with friends, parties, and school-related events. Due of its simplicity, the game may be played practically anyplace and requires little setup.

Enhances Coordination: Despite its seeming simplicity, playing paper football helps players improve their hand-eye coordination as they aim and flick their paper footballs into goalposts.

Enhances Creativity: Creating your own paper football, whether it be by adding vibrant designs or coming up with new game regulations, fosters creativity.

Portable and inexpensive: You only need a piece of paper to get started! Because of this, it’s a portable and economical exercise.

In addition to being an enjoyable craft project, creating a paper football is a thrilling game that is suitable for all ages. This straightforward but entertaining game is ideal for fostering relationships between friends, family, and even complete strangers.

So take out your paper, begin folding, and invite someone to play paper football with you. Remember to post a comment below with your favorite game modifications or share your creations with us on social media.

If you enjoyed creating a paper football, you should visit quicknewsfeed.com to see more inventive ideas and do-it-yourself activities. We have a ton of entertaining tutorials and guides ready for you. Have fun with your crafts!

Paper Football Frequently Asked Questions (FAQ)

1. First, what is a paper football?
A paper football is a tiny, folded piece of paper that is used in a game where participants win points by flicking it through goalposts.

2. How is a paper football made?
Make triangle folds around the edges of a sheet of paper after folding it in half. Tightly roll the paper into a triangle and tape it in place.

3. What kind of paper may I use?
Yes, but the finest paper is regular printer paper. You can use thicker cardboard to make the football more sturdy.

4. How is the game played?
The players alternately flick the paper football in the direction of the goalposts. The winner is the first to reach a predetermined point total.

5. How can I extend the life of my paper football?
For increased durability, use thicker paper and use tape to reinforce the folds.

6. What are some game variations?
For team games, you can add more players or alter the distance challenges and scoring zones.

7. Are adults allowed to play?
Of course! All ages like playing paper football.

8. How can I get better at flicking?
For improved control, flick the paper rapidly and precisely with your thumb and index finger.

If you’re looking for some exciting games to enjoy with friends, check out our list of 8 Fun Basketball Games to Play with Friends.

For detailed visuals and layouts, refer to our comprehensive Diagrams of Basketball Court guide.

How to Build the Ultimate Home Basketball Court: Design, Costs, and Tips

0

Many sports fans dream of building their home basketball court. It’s the ideal way to stay active, develop your game, and host a great event for family and friends. Whether you want a full-sized court or a tiny half-court, preparation is essential for success. Begin by selecting a location—indoor courts can be used all year, although outdoor courts are less expensive and mix well with outside surroundings. To ensure longevity and performance, use an appropriate surface material such as concrete, asphalt, or modular tiles. A quality basketball hoop, correct court markings, and extra additions like lights or fences will improve your playing experience. Nonslip surfaces and good drainage are also important considerations for building a safe environment.

How to Build the Ultimate Home Basketball Court: Design, Costs, and Tips

The cost of establishing a home basketball court is determined by criteria such as size, materials, and additional features. While DIY improvements might be cost-effective, professional installation ensures precision and durability, particularly for foundation and lighting. Budgeting correctly, prioritizing necessities over frills, and sourcing resources carefully will help you save money. Once your court is established, regular maintenance, such as cleaning and repairs, will maintain it in excellent condition for years to come. Personal embellishments, such as personalized colors or team logos, can make the court truly yours. With smart design and meticulous planning, your goal of the best home basketball court can become a reality, delivering endless hours of entertainment and exercise. “To learn more about the expenses involved, check out our detailed guide here: How Much Does It Cost to Build a Basketball Court?.”

Planning Your Basketball Court

Choosing a location
The first stage in constructing a basketball court is determining the best site. You will have to determine whether the court will be indoors or outdoors. Each solution has its merits and challenges.

Make sure your chosen location conforms with local zoning regulations. Check for setback restrictions and homeowner association guidelines, if any.

Court dimensions
Your basketball court’s dimensions are determined by the amount of space available. Here’s a basic breakdown.

  • Full-Sized Court: 94 by 50 feet (NBA standard).
  • Half-court: 47 by 50 feet.
  • Compact Court: Change the proportions to fit your space while keeping important lines intact.

If room is limited, prioritize important spots such as the free-throw line and three-point arc.

Surface preparation
A flat and solid surface is essential for a safe and fun court. Clear the ground of rubbish and make sure there is appropriate drainage. Compact the dirt and install a sturdy foundation, such as concrete or asphalt, for outdoor courts.

Designing Basketball Court: Surface Options

The court surface has a considerable impact on performance and durability. Here are the most popular alternatives:

  • Asphalt is inexpensive and resilient, but it cracks easily over time.
  • Concrete is durable and low-maintenance, although it is harsher on joints.
  • Wood is ideal for indoor courts because it provides outstanding traction and beauty while still requiring maintenance.
  • Modular Tiles: versatile, weather-resistant, and simple to install; available in a variety of colors and textures.

When choosing a surface material, consider your budget, climate, and maintenance requirements.

Marking the court

Accurate marks are necessary for a professional appearance. To mark the court lines, use durable paint or premade stencil kits. Concentrate on:

  • The free-throw line
  • 3-point arc
  • Key (painted region under the hoop)
  • Center circle (for full-size courts)

Essential equipment

A basketball court is incomplete without high-quality equipment. The key components include:

Basketball Hoop: Depending on your demands, you can choose between fixed, adjustable, and portable hoops.
Lighting: Install LED floodlights to properly illuminate the court during evening play.
Fencing to keep errant balls out, spectator seating, and equipment storage are all optional additions.

Cost Breakdown

Estimated cost for each component
There are several costs associated with the construction of a home basketball court. Here is a rough estimation:

Surface preparation:

  • Concrete or asphalt foundations cost $4 to $7 per square foot.
  • Modular tiles cost $3-5 per square foot.

Basketball Hoop

  • Basic models cost between $100 and $500.
  • Premium adjustable systems range from $1,000 to $5,000.

Additional Features:

  • Lighting costs between $500 and $2,000.
  • Fencing costs $10 to $20 per linear foot.
  • Custom paintings go from $300 to $800.

DIY vs. hiring professionals

DIY installation might be cost-effective, but it involves time, materials, and experience. If quality and durability are important, hire professionals for projects like as foundation pouring, electrical wiring, or custom design.

Budgeting tips
Prioritize the Essentials: Before you add extras like branding or chairs, focus on the basics.
Shop Smartly: Look for discounts, bulk offers, or refurbished equipment.
Plan for maintenance: Consider long-term upkeep costs when budgeting.

Practical Tips for an Excellent Experience

Safety Considerations

Safety is the most important consideration while designing a basketball court. Ensure:

  • Non-Slip Surfaces: To prevent slips, choose materials with strong traction.
  • cushioning: Install cushioning on walls, poles, and other hard surfaces near the court.
  • Proper Drainage: Ensure that water drains away from outdoor courts to avoid accumulating.

Maintenance Tip
Regular maintenance keeps your court in great shape. Outdoor courts should be swept, spills cleaned, and cracks repaired as soon as possible. For indoor courts, polish the surface on a regular basis and check for warping or damage.

Customizing your court
Personal touches might help to improve your basketball court. Consider:

  • Custom Colors: Use the colors of your favorite team or create your own palette.
  • Logos and graphics: Personalize the court by adding a team logo, initials, or a distinctive design.
  • For comfort and style, consider adding landscaping, seating areas, or a shaded pergola.

Frequently Asked Questions

1. How much does it cost to construct a home basketball court?
The price varies according to the size, materials, and additional amenities. A basic half-court can cost $10,000 to $20,000, and a full-sized professional court can cost $50,000 or more. Modular tiles, quality hoops, and unique features might raise the cost.

2. How big should a home basketball court be?
A full-sized court is 94×50 feet (NBA regulation), but most homes prefer a half-court, which measures 47×50 feet. For smaller locations, tailored proportions that prioritize crucial regions such as the free throw line and three-point arc are perfect.

3. Which surface is best for a basketball court?
Concrete, asphalt, modular tiles, and wood are examples of commonly used surfaces. Because of its endurance, concrete or modular tiles are commonly used for outdoor courts. Indoor courts usually have polished wood for greater traction and aesthetics.

4. What is the best way to maintain a basketball court?
The surface determines the maintenance requirements. Sweep trash, remove stains, and inspect for cracks and wear on a regular basis. Outdoor courts may need to be resealed every few years, whilst indoor courts must be polished and climate controlled to avoid warping.

5. Can I create a multi-sport court?
Yes, many homeowners create multi-purpose courts that include markings for other sports such as tennis, volleyball, and pickleball. Modular tiles are ideal for multi-sport application because of their versatility and durability.

6. What options do I have for customizing my basketball court?
Team logos, unique colors, LED lighting, sound systems, and fences are all available as customization choices. Smart hoop systems and digital scoreboards give a modern touch for tech-savvy fans.

7. Do I need authorization to construct a basketball court?
Permits may be required for construction under local zoning rules and HOA regulations, particularly for outdoor courts. Check with your local authorities to ensure you are in compliance.

8. Can I build a court on a sloping ground?
A solid foundation is essential for both safety and gameplay. If your property is sloped, you may require excavation or retaining walls to establish a level base.

9. What is a basketball court’s lifespan?
The longevity is determined by the materials and their care. Concrete courts can endure 20-30 years, modular tiles 10-15 years, and indoor wood courts several decades with good maintenance.

10. How do I make the court more kid-friendly?
Lower adjustable hoops, safety padding, and soft surface alternatives can help make the court more child-friendly. Adding enjoyable aspects such as bright graphics or games painted on the surface can further improve the experience.

A home basketball court is a worthwhile investment that provides exercise, entertainment, and family togetherness. Whether you choose a simple half-court or a lavish indoor setup, careful planning and design will ensure it suits your requirements and budget. Begin creating your dream court today and enjoy endless hours of basketball at home.

Share this information with others and get more sports-related tips and ideas on Quick News Feed!

8 Fun Basketball Games to Play with Friends

0

Basketball does not have to be an aggressive, high-energy five-on-five game with players rushing up and down the court. It does not have to be a solitary pastime, such as practicing your shots alone. Instead, it may be a pleasant blend of entertainment, laughter, and mild competitiveness, ideal for sharing with friends and family. Basketball’s beauty resides in its adaptability—sometimes all you need is a ball, a hoop, and a little imagination to turn the game into something unique.

We’ve developed a list of eight popular basketball games to help you get the most out of your sessions. Each has a distinctive twist that breathes new life into the traditional versions, assuring hours of fun and great memories with your loved ones. Whether you want to improve your skills or have fun, these games will surely provide. To get a comprehensive understanding of the factors influencing the cost of building a basketball court, including materials, size, location, and additional features, check out our in-depth guide on the subject of how-much-does-it-cost-to-build-a-basketball-court, designed to help you plan your project efficiently and budget effectively.

H-O-R-S-E

H-O-R-S-E is a classic and popular basketball game that is suitable for players of all abilities. The game begins with players taking turns shooting from whatever location on the court they want. Once a player makes a successful shot, the other players must attempt to repeat it from the same location and in the same manner. If a player misses the shot, they receive a letter from the word “HORSE.”

The game continues, with participants receiving letters for each missed shot. When a player accumulates all of the letters to spell “HORSE,” they are eliminated. This process continues until only one player remains, who is crowned the winner. Simple yet endlessly enjoyable, H-O-R-S-E is a terrific way.

How to Play: Each player takes turns attempting a shot. If the first player makes the shot, the other players must repeat it. If they miss, they will receive a letter from the word “HORSE.” The game continues until one participant has finished the word, at which time they are eliminated.

Tips for Increasing the Fun: Encourage players to be inventive with trick shots, such as shooting from behind the backboard or with one hand. This keeps the game lively and tests everyone’s skill level.

Why it is great: Horse is an excellent game for improving your shooting accuracy and testing out new shots.

knockout

This game usually begins at the free throw line, but you can start anywhere on the court to liven things up. Players form a single file, and the first person in line takes a shot to begin the game. As soon as the first player releases their shot, the second in line can take theirs.

The goal is simple: the second player must shoot before the first player can rebound and score. If the first player makes the shot, they throw the ball to the next person in line and go to the back of the line, keeping the game going. However, if the first player misses the shot, they must rebound and score.

If the second player makes a shot before the first player can score, the first player is eliminated. This elimination procedure continues until just one player survives and is proclaimed the winner. The game’s fast speed makes it fun, tough, and popular with groups of all skill levels.

How to Play: Players form a single-file line at the free throw line. The first two players each carry a basketball. The idea is to get your shot in before the person behind you does. If the second player takes their shot first, the first player is “knocked out.” The game lasts until one player remains.

Ideal Group Size: For a seamless rotation, play with 3-10 participants.

Why it is fun: The combination of speed, strategy, and pressure shooting keeps everyone on their toes. Furthermore, the rapid pace ensures that no one sits out for long.

 21 (or cutthroat)

The game begins with the first player dribbling out and attempting to score, while the other player(s) play as defenders, seeking to prevent any points from being scored. The offensive player has the option to take a shot at any time, and if they fail, they can go for the rebound and attempt again.

If the defensive player(s) secures the rebound, they must “clear” the ball by dribbling it beyond the three-point line before taking a shot. When the ball is cleared, the defensive player switches to offense and attempts to score. If the offensive player scores, the defensive player advances the ball beyond the three-point line to clear it and begin their offensive effort.

This back-and-forth continues until one player has 21 points and wins the game. Points are usually awarded as follows: one point for baskets made inside the three-point line and two points for shots made beyond it. If you want to add another level of difficulty, you can modify the scoring system to include three points for long-range shots.

The game’s mix of offensive, defense, and strategy makes it a thrilling and competitive approach to enhance individual talents while having fun.

How to Play: Each participant competes independently to score precisely 21 points. Points can be earned by shooting field goals or taking free throws, and you can also defend against other players to keep them from scoring. If a player gets beyond 21, his or her score resets to 13.

Pro tip: If a three-point line is available, use it to expand your scoring possibilities and strategy.

Why It’s Popular: The game’s intensity and competitiveness make it an excellent way to hone both offensive and defensive abilities.

Around the World

The goal of this game is to “travel around the world” by taking consecutive shots from specific positions on the court. Typically, the sequence begins with a layup, followed by a shot between the layup and the free throw line, then a free throw, and finally positions around the three-point arc.

You can set the rules ahead of time to accommodate varying skill levels. Players can either be required to make each shot in order to go on to the next position, or they can “bank” their progression. This means they can opt to halt their turn after taking a shot to prevent missing and losing their position, and then pass the round to the next player. This freedom creates the game enjoyable and challenging for players of all abilities.

How to Play: Players take turns shooting from predefined positions around the key or three-point arc. If a player makes a shot, they advance to the next position. If they miss, they can select “stay” or “risk” and retake the shot. Missing the risk shot sends them back to the beginning.

Creative Variations: To make the game more entertaining, add extra spots or trick shots.

Why It’s Beneficial: It’s a great opportunity to improve your shooting technique while competing in a friendly environment.

 King of the Court

King of the Court is the ultimate one-on-one battle that challenges your offensive and defensive skills.

How to Play: One player begins as the “king” and competes against challengers in a one-on-one match. The first player to score remains on the court while the challenger rotates out. The game continues until the player reaches a certain amount of wins.

Why Does It Stand Out: The one-on-one format encourages participants to improve their moves and defenses. It’s a terrific game for practicing ball control and scoring under duress.

Dribble Knockout

Dribble Knockout is a dynamic game that improves dribbling abilities and fast thinking.

How to Play: Each participant dribbles within a specific area, attempting to knock others’ basketballs out of bounds while protecting their own. Players who lose the ball are eliminated, and the last person to dribble wins.

How to Increase Difficulty: Reduce the play area gradually to make the game more demanding.

Why It’s Exciting: Dribble Knockout is a favorite among players of all ages because to its constant action and the need for quickness.

Shark and Minnow

Sharks and Minnows is a lively, high-energy game ideal for large parties.

How to Play: One or two players begin as “sharks” at midcourt, with the remainder as “minnows” at the baseline. The minnows must dribble to the opposing baseline without losing the ball to the shark. Players who lose their ball are transformed into sharks in the following round.

Fun twists: Make the game more difficult by adding obstacles or dribbling with only one hand.

Why It’s Fun: Sharks and Minnows is ideal for honing dribbling abilities under duress while also giving plenty of entertainment.

 Free-throw contest

A Free Throw Contest is basic yet competitive, concentrating on one of basketball’s most important abilities.

How to Play: Players take turns shooting free throws, with a predetermined amount of attempts per round. The player who made the most shots wins.

Why It is Worth Trying: It’s a low-intensity game that promotes focus and shooting technique while providing a break from more physically demanding activities.

Tips for an Awesome Basketball Game Session

To make your basketball game experience as joyful as possible, keep these things in mind:

Warm up properly: Begin with mild stretches and dribbling routines to prevent injuries and increase performance.

Challenges: To keep games interesting, add thematic challenges such as “weak hand only” or “no-look passes”.

Rotate Players: In larger groups, establish explicit rotation rules to guarantee that everyone has an opportunity to play.

FAQs: What People Ask About Fun Basketball Games

1. What fun basketball games are suitable for beginners?
Beginners might enjoy games such as Horse, Around the World, and Knockout. These games emphasize fundamental abilities such as shooting and dribbling while keeping the competition light and fun.

2. Can the basketball games be played indoors?
Yes, the majority of these games, including Free Throw Contest, King of the Court, and Dribble Knockout, may be played on indoor courts. Make sure the place is safe and open for movement.

3. What number of players are required for these games?
The number of players varies each game:

  • Horse: two or more players.
  • Knockout: 3-10 participants.
  • Sharks and Minnows: Larger groupings (5+ players) perform well.
  • 21: 3-5 players for a fair competition.

4. Can I play these games with only two players?
Yes! Games such as Horse, Around the World, and King of the Court are ideal for two players. They support pleasant one-on-one competitions.

5. What are some fun basketball games for children?
Kids enjoy lively games such as Sharks and Minnows, Knockout, and Dribble Knockout. These games are easy, fun, and help you develop basic basketball abilities.

6. How can I make basketball games more challenging?
Use trick shots or create new shooting areas in Horse and Around the World.
To make Dribble Knockout more challenging, shrink the play area.
Introduce time constraints or specific regulations to any game, such as weak-hand dribbling.

7. Are these games useful for honing basketball skills?
Absolutely! Each game emphasizes distinct aspects of basketball:

  • Horse and Around the World: Shooting precision and ingenuity.
  • Knockout: Ability to shoot quickly and under duress.
  • Dribble Knockout tests ball-handling and agility.
  • King of the Court: One-on-one attacking and defensive abilities.

8. How do I promote fair play during games?
Establish clear guidelines before beginning and stress sportsmanship. Rotate players frequently, especially in games featuring elimination rounds, to ensure that everyone gets an opportunity to play and enjoy.

Basketball provides limitless potential for enjoyment and interaction, especially when inventive games are played outside of the usual structure. These eight games, ranging from the accuracy of Horse to the agility of Dribble Knockout, cater to a wide range of skill and interest. So gather your pals, take the court, and try these entertaining basketball games. You’ll not only have a great time, but you’ll also improve your talents and bond with your teammates. Learn the official height of a basketball hoop and key details on how-high-is-a-basketball-hoop.

Visit quicknewsfeed.com to be motivated with more basketball tips, ideas, and fun articles!

Top Indoor Basketball Courts: Designs, Dimensions, and Setup Tips

0

Indoor basketball courts are becoming increasingly popular in households, schools, and community centers. They offer a secure, regulated atmosphere for year-round play and training, making them popular among both amateurs and professionals. In this post, we’ll go over everything you need to know about indoor basketball courts, from conventional dimensions and designs to setup instructions and upkeep. I’d like to begin designing the ideal indoor court for your specific requirements.

Indoor basketball facilities have evolved drastically throughout time to meet the changing needs of players and viewers. Modern arenas now include cutting-edge features aimed to improve performance, safety, and overall pleasure. “Find out the answer to the question of how much does it costs to build a basketball court.

A History of Indoor Basketball

Indoor basketball originated in the late nineteenth century when Dr. James Naismith created the sport in Springfield, Massachusetts. Initially played in small YMCA gyms and school facilities, indoor basketball quickly gained popularity due to its flexibility in enclosed areas.

Top Indoor Basketball Courts: Designs, Dimensions, and Setup Tips

The venues evolved along with the game. What began with simple wooden flooring and few amenities evolved into modern sports facilities. Indoor facilities have evolved over the decades to include technologies such as synthetic flooring, advanced climate control systems, and LED lighting, resulting in world-class environments for both players and spectators.

Key characteristics of modern indoor basketball courts

1. Standardized dimensions
Modern indoor basketball courts follow tight criteria established by regulating bodies such as the FIBA and NBA. A full-size court is 94 feet long and 50 feet wide, assuring consistency for both professional and leisure play.

2. Specialized Flooring
Flooring is essential for safety and performance. Most indoor courts employ hardwood or synthetic materials that are designed to:

  • Ensure constant ball bounce.
  • Provide high traction to reduce slipping.
  • Reduce player fatigue by absorbing impacts.

3. Advanced lighting systems
Modern indoor basketball courts use high-quality lighting systems. These mechanisms ensure:

  • Even lighting throughout the court.
  • There is less glare, allowing for great visibility.
  • Increased player focus during fast-paced games.

4. Climate control
Temperature and humidity control systems ensure optimal playing conditions for players while also preserving the flooring from moisture damage.

Indoor Basketball Equipment You Must Have

Indoor basketball necessitates a variety of specialised equipment to improve the gameplay experience and assure safety:

1. Basketballs
Indoor basketballs are often composed of leather or high-quality composite materials, providing better grip and durability than their outdoor counterparts.

2. Hoop and Backboard
Hoops are fixed at a standard height of 10 feet.
Backboards are constructed of tempered glass or tough acrylic to endure rough play and many dunks.

3. Player Gear
Players wear specialist footwear intended for indoor courts, which provides superior grip and cushioning. Knee pads, ankle braces, and compression garments are examples of additional items that aid in injury prevention and performance improvement.

Advanced Lighting Systems: The Unsung Hero

When you walk into a modern indoor basketball arena, you can’t help but notice how new lighting systems affect the atmosphere. LED illumination has transformed indoor courts, providing a blend of usefulness, aesthetics, and efficiency.

Functionality and performance
The LED lights are precisely adjusted to:

  • Reduce glare and shadows.
  • Each action on the court should be highlighted precisely.
  • Provide steady illumination, which improves player performance and audience enjoyment.

Aesthetics and immersion
Beyond functionality, LED lighting creates an immersive ambiance. Dynamic lighting effects can improve pre-game presentations or highlight critical events during a game, leaving spectators with an unforgettable experience.

Energy Efficiency
LED lighting is not just about performance; it is also a proponent of sustainability. LED solutions lessen environmental impact while lowering operating costs because they use less energy and have longer lifespans.

Indoor Basketball Court Rules and Regulations

While the fundamental rules of basketball are the same whether indoors or outside, various laws related to indoor basketball assure player safety and fair competition. Because of the controlled atmosphere they provide, indoor courts often have stricter standards for court borders, foul limits, and equipment usage.

Differences Between Indoor and Outdoor Basketball: Environmental Factors Indoor basketball eliminates external variables such as wind, rain, and uneven terrain that might interfere with outdoor play. This provides a level playing field and predictable conditions.
Indoor courts have well-defined boundaries that are unobstructed by exterior obstructions, allowing for uninterrupted gameplay.
Equipment Standards: Indoor hoops, backboards, and flooring fulfill established professional play specifications, resulting in consistent performance.
Indoor courts remove the variability produced by outdoor circumstances, allowing players to concentrate solely on their strategies, execution, and teamwork.

The advantages of playing basketball indoors

Indoor basketball has various benefits, making it a popular choice for players of all ability levels.

1. Controlled Environment
Indoor courts are resistant to weather disturbances, allowing for year-round play. Players may train consistently without being concerned about rain, wind, or harsh temperatures.

2. Improved amenities
Indoor facilities commonly include:

  • Locker rooms for players.
  • Fans can sit in the spectator seats.
  • Concession stands and bathrooms are provided for convenience.

These aspects help to provide a professional and comfortable environment for both players and attendees.

3. Safety and comfort
The climate-controlled environment creates ideal playing conditions. With no uneven terrain or exposure to severe elements, the chance of injury is reduced, allowing athletes to perform to their full potential.

4. Community appeal
Indoor courts are about more than simply the game; they’re about building relationships. These places frequently hold activities and events that bring people together, strengthening community ties.

Community involvement and outreach

Indoor basketball courts are an important part of community development. Aside from hosting professional games, they are bustling engagement centers, with programs and events that promote healthy lifestyles, youth development, and social inclusion.

1. Leagues for Youth Basketball
Indoor courts serve as a venue for young leagues and competitions, fostering talent and imparting vital life skills like:

  • Teamwork.
  • Discipline.
  • Sportsmanship.

These projects help to develop the next generation of athletes while teaching lasting values.

2. Skill-development clinics
Professional athletes and coaches frequently hold clinics and workshops in indoor facilities. These seminars focus on:

  • Shooting tactics.
  • There are defensive strategies.
  • Overall basketball intelligence.

Experienced professionals motivate new sportsmen to improve their skills by sharing their knowledge.

3. Community Activities and Fundraisers
Indoor arenas regularly host:

  • Basketball games held for charity.
  • Local fundraisers.
  • Cultural festivities.

Such gatherings promote togetherness and bring disparate groups together, instilling a sense of belonging and supporting key efforts.

4. Basketball Camps and Academies
Elite camps and academies flourish in indoor surroundings, providing intensive programs that prepare players for competitive basketball. These camps commonly provide:

  • Outstanding coaching.
  • Access to cutting-edge facilities.
  • Opportunities for competitive match-ups.

Participants develop the skills, discipline, and exposure required to achieve at higher levels of play.

Why Choose an Indoor Basketball Court?

Indoor basketball courts have many advantages, including:

  • Weather Protection: Indoor courts, as opposed to outdoor courts, protect players from rain, snow, and extreme heat, allowing for continuous play.
  • Indoor courts have smooth surfaces and are regulated conditions, which reduces the chance of injury.
  • Year-Round Accessibility: An indoor court allows players to practice and play year-round.

Standard Dimensions and Specifications

Understanding the dimensions and needs of an indoor basketball court is critical for effective planning.

1. Official dimensions
NBA: A regular NBA court is 94 feet long and 50 feet wide, with a 3-point line 23.75 feet from the basket.
FIBA: International courts are slightly smaller, measuring 91.86 feet by 49.21 feet with a 3-point line at 22.15 feet.
High school: These courts are 84 feet by 50 feet, making them perfect for smaller areas.
Half-Court: A suitable solution for personal usage, measuring 42 feet by 50 feet, depending on available space.

2. Ceiling Height
The optimum ceiling height is 16-20 feet, which provides enough space for high shots and rebounds.

3. Court markings
Free-throw line is 15 feet from the backboard.
Key (or paint) measures 16 feet broad (NBA) or 12 feet wide (FIBA).
The center circle measures 12 feet in diameter.

Top Indoor Basketball Court Designs

Your indoor court will be designed based on your needs, budget, and available space. Here are a few popular options:

1. Luxury Homes Courts
Luxury courts use high-quality materials such as polished hardwood floors, LED lighting, and customised logos. Some models feature retractable hoops, integrated music systems, and climate control for enhanced comfort.

2. Commercial and community centers
These courts are built to last and often feature synthetic flooring to endure severe use. The seating configurations, scoreboards, and locker facilities make them suitable for tournaments and leagues.

3. Smaller Personal Courts
Compact courts are ideal for families with limited space. They frequently contain folding hoops, wall-mounted equipment, and multifunctional flooring that may be used for other purposes.

4. Multipurpose Courts
Adjustable netting and flooring systems allow these adaptable courts to handle basketball, volleyball, or badminton.

Important Tips for Setup

Establishing an indoor basketball court necessitates careful consideration of several factors:

1. Flooring options
The floor is the cornerstone of your court, influencing playability, safety, and longevity.

Hardwood: The professional standard, with superb bounce and looks.
Synthetic: Long-lasting and low-maintenance, ideal for community centers.
Rubberized: Offers extra cushioning, making it suitable for young players.

2. Light and Ventilation
Use LED lights to provide strong, even illumination with no glare.
Proper ventilation or air conditioning is essential for player comfort and moisture management.

3. Wall Pads and Safety Features
Install wall cushioning to reduce the chance of injury during fast-paced games.

4. Hoop and Equipment
Choose adjustable hoops to suit players of all ages.
For optimal performance, invest in high-quality tempered glass or acrylic backboards.

5. Acoustics Soundproofing materials can reduce noise levels, particularly in residential environments.

FAQs about indoor basketball courts

1. What is the size of an indoor basketball court?
A conventional indoor basketball court is 94 feet long and 50 feet wide, according to NBA and FIBA specifications. High school courts may be slightly smaller, measuring 84 feet by 50 feet.

2. What type of flooring is utilized on indoor basketball courts?
Most indoor basketball courts include hardwood flooring, notably maple wood, which is noted for its durability and steady ball bounce. Some courts may use synthetic surfaces to save money and serve many purposes.

3. What lighting methods are used on indoor basketball courts?
Indoor basketball courts use LED lighting systems to save energy, reduce glare, and provide uniform illumination, ensuring excellent sight for players and spectators.

4. What are the differences between indoor and outdoor basketball courts?
Indoor courts include polished hardwood or synthetic floors, whilst outdoor courts are built of concrete or asphalt.
Indoor courts provide controlled settings without weather disturbance. Outdoor courts are subject to elements such as wind, rain, and uneven terrain.
Indoor equipment is held to tight standards, ensuring consistent performance, whereas outdoor hoops and basketballs are built to resist harsh conditions.

5. Can indoor basketball courts accommodate other sports?
Yes, many indoor courts are multipurpose and can accommodate activities such as volleyball, badminton, and futsal. Synthetic flooring is commonly utilized in such facilities to support a variety of activities.

6. What is the cost of building an indoor basketball court?
The price varies depending on the size, materials, and additional amenities. On average:

  • A basic indoor court may cost $50,000 to $100,000.
  • A professional-grade court with enhanced lighting, seats, and amenities can cost over $200,000.

Indoor basketball courts are more than just playing surfaces; they are important centers for sports, community, and personal development. Indoor courts, which have strong rules and regulations in place to ensure fair play and safety, are excellent for players to hone their skills and enjoy the game.

Furthermore, these institutions contribute to community participation through youth programs, skill clinics, and cultural events. Whether you’re a beginner or a seasoned pro, indoor basketball has a wide range of benefits that enrich lives and communities.

What’s your dream indoor basketball court design? Share your ideas or favorite examples in the comments below! “Visit Quick News Feed for the latest updates, tips, and insights on sports, lifestyle, and more!”

Diagrams of Basketball Courts: Complete Guide with Dimensions and Layouts

0

Basketball courts are more than just playing surfaces; they are meticulously constructed venues that influence the game’s structure and flow. Every line, marker, and size on the basketball court diagram serves a purpose and influences games, strategy, and how players approach each time on the court. Every feature, from the three-point arc that tests shooters to the key that tests post-players, is essential to create dynamic and competitive action. Understanding these facts benefits not just the athletes, but also the coaches, officials, and fans.

Basketball court diagrams: Complete Guide with Dimensions and Layouts

Whether you’re polishing your jump shot, formulating a defensive game strategy, or guaranteeing fair play as an official, understanding basketball court layouts is crucial. The court’s design promotes teamwork, sharpens skills, and allows for tactical brilliance. This book delves into every aspect of basketball court diagrams, providing insights into their components, dimensions, and variances across different levels of play, allowing you to develop a deeper understanding of the game.

To learn more about the costs involved in constructing a basketball court, visit our detailed guide: How Much Does It Cost to Build a Basketball Court?. This resource will allow you to develop a deeper understanding of the game. . Additionally, if you’re curious about the standard height of a basketball hoop and how it impacts gameplay, check out our article: How High Is a Basketball Hoop?. These resources will help you develop a deeper understanding of the game.

An Overview of a Basketball Court

A basketball court is a rectangular area where the game is played. It is divided into two parts, each with a basket in the center and fixed on a backboard. The court has a variety of markers and regions that govern gameplay, including the free-throw line, three-point arc, and key.

Basic Elements of a Basketball Court:

Court Dimensions:

  • Center Circle
  • Three-Point Line Key (Paint Area)
  • Free-throw lines
  • Sidelines and baselines
  • Basket and Backboard
  • Restricted Area Arc

Basketball Court Dimensions

NBA Court Dimensions

The National Basketball Association (NBA) courts are larger than the majority of other courts. They have measurements tailored to professional play.

  • Court Size: 94 feet long (28.65 meters) and 50 feet broad (15.24 meters).
  • Center Circle: 12 feet (3.66 meters) in diameter.
  • Three-point line:
  • Arc radius: measures 23.75 feet (7.24 meters) from the basket’s center.
  • Corner distance: 22 feet (6.7 meters) from the basket.
  • Free-Throw Line: 15 feet (4.57 metres) from the backboard.
  • Dimensions: 16 feet (4.88 meters) broad by 19 feet (5.8 meters) long.
  • Basket Height: The rim is 10 feet (3.05 metres) above the court.

FIBA court dimensions

The International Basketball Federation (FIBA) controls basketball on a global scale, and its courts are slightly smaller than NBA courts.

  • Court Size:  91.86 feet (28 meters) long and 49.21 feet broad (15 meters).
  • Center circle: 11.81 feet (3.6 meters) in diameter.
  • Three-Point Line:
  • Arc radius measures 22.15 feet (6.75 meters) from the basket’s center.
  • Corner distance: 21.65 feet (6.6 meters).
  • Free-throw line: 15.09 feet (4.6 meters) from the backboard.
  • Key dimensions: 16.08 feet (4.9 meters) broad.
  • Basket height: 10 feet (3.05 meters)

Dimensions of High School Basketball Courts

In the United States, high school basketball courts are designed with precise proportions to accommodate younger players.

  • Court dimensions are 84 feet (25.6 meters) long and 50 feet (15.24 meters) broad.
  • Center Circle: 12 feet (3.66 meters) in diameter.
  • Three-point line:
  • Arc radius measures 19.75 feet (6.02 meters).
  • Free-Throw Line: 15 feet (4.57 metres) from the backboard.
  • Key dimensions: 12 feet (3.66 meters) broad.

College Basketball Court Dimensions:

NCAA courts differ slightly from professional ones, including characteristics of high school and NBA courts.

  • Court dimensions: 94 feet (28.65 meters) long and 50 feet (15.24 meters) broad.
  • The center circle measures 12 feet (3.66 meters) in diameter.
  • Three-point Line:
  • Arc radius: 22.15 feet (6.75 metres).
  • The free-throw line is 15 feet (4.57 meters) from the backboard.
  • Key dimensions are 12 feet (3.66 meters) broad.

Diagrams of basketball courts

  •  NBA Full Basketball Court

basketball court diagram: Complete Guide with Dimensions and Layouts
Basketball_-_NBA_-_field_diagram_-en.svg
  •  International Full Basketball Court

basketball court diagram: Complete Guide with Dimensions and Layouts
Basketball_-_FIBA_-_field_diagram_-en.svg
  •  College Basketball Court

Basketball court diagram: Complete Guide with Dimensions and Layouts

  • High School Basketball Court
basketball court diagram: Complete Guide with Dimensions and Layouts
high-school-basketball-court-dimensions-scottfujita-1
  •  Basketball Half Court

Basketball court diagram: Complete Guide with Dimensions and Layouts
46×30-basketball-half-court-plan-drawing

The following are thorough descriptions of the main parts of a basketball court, along with their purposes.

1. The Central Circle
The game begins with a tip-off from the center circle. The circle’s circumference varies slightly depending on the regulating organization.

NBA: 12 feet (3.66 metres)
FIBA: 11.81 feet (3.6 m)
The tip-off occurs in the center circle, where the referee throws the ball up and players jump to gain possession.

2. The Three Point Line
The three-point line goes around the basket. Any shot taken beyond this line earns three points. The distance between the line and the basket varies.

NBA: 23.75 feet (7.24 meters) at the arc and 22 feet (6.7 meters) at the corners.
FIBA: The arc is 22.15 feet (6.75 meters) long, and the corners are 21.65 feet (6.6 meters).
High school: 19.75 feet (6.02 meters).

3. The Key (Paint Area)
The rectangular region beneath the basket is where the key, often known as “the paint,” is located. This zone is vital for offensive and defensive plays since it is extensively monitored.

NBA dimensions: 16 feet wide.
FIBA dimensions: 16.08 feet wide.
High School is 12 feet wide.

4. The free throw line
Following a foul, players shoot unchallenged at the free-throw line. Most standards specify 15 feet from the backboard. The line is a primary focus in both practice and games.

5. Restricted Area Arc
The restricted area arc is a semi-circle situated beneath the basket. Defensive players within this arc cannot draw charging fouls.

NBA: 4 feet (1.22 meters) radius.
FIBA: Similar measurements.

6. Sideline and Baseline
The sidelines mark the court’s length, while the baselines mark its breadth. These limits define the play area:

NBA: 94 feet by 50 ft.
FIBA dimensions: 91.86 feet by 49.21 feet.
High School is 84 feet by 50 feet.

Specialized Court Markings

Half Court Line
The half-court line separates the court into two equal parts. In the NBA, teams must advance the ball past this line in eight seconds, but in high school and college, they must do so in 10.

Team Bench and Scorers’ Table
The sides around the center court frequently house team benches and the scorers’ table, where timekeepers and officials oversee the game.

Outdoor and recreational basketball courts

While professional courts have strict dimensions, outdoor and recreational courts may differ:

  • Court sizes can range from half-courts to full-courts, depending on available space.
  • Materials: Outdoor courts are often composed of asphalt or concrete.
  • Customizations: Some recreational courts have unique color schemes or additional lines for different sports.

Common Questions About Basketball Court Layouts

1. What is the key’s purpose?
The key acts as a limited zone for players, restricting their time within to prevent penalties. It promotes fair play near the basket.

2. Why do three-point lines vary in length?
Three-point lines are changed to reflect player skill levels and the game’s regulatory body. Professional leagues, like as the NBA, have longer fields than high school courts.

3. What’s the difference between backboards and baskets?
All leagues use the same dimensions for backboards (6 feet wide and 3.5 feet tall) and baskets (18 inches in diameter). However, the materials used for outdoor courts may differ.

4. What is the length of the three-point line?
The distance between the three-point line varies by league:

NBA: 23.75 feet at the arc, 22 feet in the corners.
FIBA dimensions: 22.15 feet at the arc, 21.65 feet at the corners.
High school height is 19.75 feet.

5. What is the limited area’s arc?
The restricted area arc is a semi-circle beneath the hoop where defensive players are unable to draw charging fouls. The NBA and FIBA use a radius of four feet.

6. Why do court sizes vary among leagues?
Court sizes are changed to match the skill level and physical abilities of the players. Professional leagues such as the NBA use wider courts to allow faster-paced action.

7. What materials are utilized in basketball courts?
Indoor courts are often made of hardwood, whilst outdoor courts are often composed of asphalt or concrete to provide durability.

8. How much does it cost to construct a basketball court?
The cost varies according to size, material, and location. A regular full-size court can cost anything from $20,000 to over $100,000.

How to build a basketball court

Building a basketball court takes careful design and execution. Key considerations include:

  • Space Requirements: Allow enough room for the specified court size.
  • Surface Materials: You can choose between hardwood, asphalt, or concrete.
  • Court markings: To ensure exact lines, use the right paint or tape.
  • Hoop Installation: Secure the hoop and backboard to fulfill height requirements.

To summarize, the design and layout of a basketball court are critical to the game, influencing how players, coaches, and officials approach all aspects of play. The precise measurements of the three-point line, as well as the uniformity of rim height, maintain justice and consistency while increasing the sport’s excitement and competition.

Understanding the components and measurements of basketball courts throughout leagues helps you appreciate the delicate mix of skill, strategy, and organization. Whether you’re on the court, evaluating a game, or expanding your knowledge as a fan, understanding the basketball court layout is critical to fully participating with this worldwide popular sport. For more informative articles and updates on a wide range of topics, explore our website: QuickNewsFeed.

How much does it cost to build a tennis court?

0

Tennis is more than simply a game; it’s a lifestyle. This globally popular racket sport has a deep history and continues to captivate hearts worldwide. Tennis is special in Europe, particularly in the United Kingdom, where lawn tennis originated in the 1800s. Wimbledon is still a symbol of British culture and a highlight of the international athletic calendar. Discover how many sets are played in tennis with this complete guide.

How much does it cost to build a tennis court?
stadium-tennis-court-tennis-a333c3-1024

However, while tennis appeals to people of all ages and skill levels, finding a good court is not always easy. Building a court can be a game changer if you love tennis and have the funds. How much does it cost to create a tennis court?

How much does it cost to build a tennis court?

How much does it cost to build a tennis court?

The good news is that it may be more economical than you realize. For example, an outdoor swimming pool may cost £85,000 on average, whilst a tennis court costs roughly £45,000. Of course, this figure changes depending on the surface type, location, and other characteristics.

This guide will lead you through the expenses, surface alternatives, and factors to consider when deciding whether to build a tennis court. Also learn what a “walkover” means in tennis with this quick read.

Choosing the Right Surface for Your Tennis Court


How much does it cost to build a tennis court?

The surface you choose has a huge impact on the cost, upkeep, and playing experience. Here are the most popular surface types:

1. Hardcourt (Macadam or acrylic)

  • Cost: From £53,000.
  • Hard courts are long-lasting, require little care, and may be used all year. They’re perfect for schools, clubs, and private courts.
  • Popular variants:
  • Pladek: Pladek courts, which are made of open-textured Macadam, are both inexpensive and popular.

2. Artificial grass (Tenniturf, Savanna)

  • Cost: £58,000 to £64,000.
  • Features: Artificial grass courts are gentle on joints and extremely durable, lasting up to 30 years with regular maintenance.
  • Tenniturf is sand-filled artificial grass with a natural feel.
  • Savanna: Sand-filled with extra cushioning for maximum comfort.

3. Specialist Surfaces (Omniclay)

  • Cost: Approximately £70,000
  • Features: Omniclay simulates clay-like playing conditions without the heavy maintenance, making it an ITF-approved professional choice.

Site preparation and location consideration

How much does it cost to build a tennis court?


1. Land Preparedness
Land preparation entails levelling and stabilizing the area, which may necessitate excavation. The cost ranges from £5,000 to £20,000, depending on the state of the site.

2. Access
Make sure the building location is accessible to vehicles and equipment. Limited access may result in higher labour expenses.

3. Drainage
Water accumulation must be prevented through proper drainage. Installing a drainage system might cost between £8,000 and £15,000.

Location

The cost of a site is heavily influenced by its geographical location and terrain. Factors include:

  • Land Preparation: Excavating or leveling uneven or steep ground may cost $5,000 to $20,000 more.
  • Permits and Regulations: Permit and inspection fees vary by location, ranging from $500 to $5,000.

Court Dimensions
A conventional tennis court measures 78 feet by 36 feet, but the entire surface, including run-off space, is around 120 feet by 60 feet. Larger rooms result in higher construction and material expenses.

 Additional features

Customizations can improve your court, but they can increase costs.

  • Fencing: Installing a fence for security and ball containment costs between $5,000 and $15,000.
  • Lighting: For nighttime gaming, expect to invest $10,000 to $20,000 on high-quality LED lighting.
  • Net Posts and Nets: A simple net setup costs between $500 and $1,000.
  • Seating or Benches: Adding spectator seating can cost anywhere between $1,000 and $5,000.
  • Drainage System: Proper drainage can cost an additional $3,000 to $10,000.

Cost breakdown for building a tennis court

Below is a full analysis of the primary expenses involved:

  • Expense Category: Estimated Cost Range Surface Material: $40,000–$150,000
  • Land Preparation$5,000 – $20,000
  • Fencing$5,000 – $15,000
  • Lighting$10,000 – $20,000
  • Drainage System: $3000 – $10,000.
  • Net and Accessories $500 – $1,000
  • Permits and Inspections$500 – $5,000
  • Labor Costs$10,000 – $30,000
  • Total estimated cost ranges from $70,000 to $250,000+.

Construction Timeline

It usually takes 6 to 8 weeks to build a tennis court on a clean, flat location.

How much does it cost to build a tennis court?

Week 1: Planning and Site Preparation
Site Analysis:

  • Assess the site’s size, slope, drainage, and accessibility.
  • Identify potential obstructions, such as trees, rocks, or underground utilities.

Finalize the design:

  • Choose the court surface, dimensions, and any additional features (such as fencing or lights).
  • Get any necessary permits or approvals.

Clearing the ground

  • Remove any plants, garbage, or constructions from the area.

Week 2-3: Earthwork and Foundation Site Grading:

  • Level the ground to guarantee a flat, strong foundation.
  • Remove excess dirt or fill low spots as needed.

Drainage Installation:

  • Install drainage systems to prevent water accumulation.
  • Connect the drain to the appropriate outlet.

Basic Construction:

  • To ensure stability, lay a base of crushed stone or aggregate.
  • To prevent settling, compact the base with heavy machines.

Week 4-5: Surface installation and sub-base application

  • Apply a layer of concrete or asphalt (as needed by the surface type).
  • Allow the sub-base to cure for at least seven days.

Surface Layering

  • Install the desired playing surface (such as synthetic turf, acrylic, or clay).
  • To ensure consistent play, make sure the surface is set uniformly.

Line Markings:

  • Paint the court lines using the standard tennis proportions.
  • Allow the paint to thoroughly dry.

Week 6: Final touches on fencing and equipment installation

  • Set up fences to protect the court and keep balls within the area.
  • Install net posts, nets, and other required equipment.

Lighting is optional

  • Install floodlights if you want to play in the evening.
  • Test the lighting system to ensure adequate coverage.

Inspection and cleanup:

  • Inspect the court for any flaws or incomplete work.
  • Clean up the construction debris and complete the project.

Weeks 7-8: Final Curing and Handover – Surface Curing

  • Allow the surface to settle or cure (depending on the substance).

Final Walkthrough:

  • Perform a walkthrough with the contractor to confirm your satisfaction.

Ready to play:

  • After curing, the court is ready for use.

Additional Equipment Costs

1. Posts Socketed posts are securely placed into the court surface and often used in schools and clubs.

  • Freestanding Posts: Portable choices that can be moved using a trolley.
  • Cost: Between £300 and £1,000, depending on the type.

2. Nets: Club nets cost around £140, while tournament nets might cost up to £280.

  • Using a torque limiter handle to keep the net from being overtightened will help it last longer.

3. Fencing
Fences keep animals out of the court and keep balls in. A basic fence costs approximately £9,500.

4. Lighting
Installing floodlights for night play costs between £10,000 and £20,000.

5. Line Marking Professional equipment is needed for precise line marking, which can cost between £500 and £1,500.

Steps for Building a Tennis Court

Step 1: Plan and Budget
Begin by estimating your budget and choosing a surface type. Consult contractors to obtain comprehensive pricing and timelines.

Step 2: Select the Location
Ensure that the chosen site meets the necessary dimensions and takes into account considerations such as sun orientation and wind exposure.

Step 3: Obtain permits
Check local regulations and obtain all essential licenses for construction.

Step 4: Prepare the Land
Clear and level the soil, construct drainage systems, and build a strong foundation.

Step 5: Install the Surface
Lay the specified surface material precisely. This phase is crucial to playability and durability.

Step 6: Include Fencing and Accessories
Set up fencing, lighting, nets, and any other desired elements.

Step 7: Final inspection
Ensure the court.

Legal and Regulatory Considerations

Planning Permission
In most circumstances, constructing a tennis court does not require planning permission because it falls under Permitted Development. However, there are certain exceptions:

  • Areas of Outstanding Natural Beauty
  • National Parks & Conservation Areas
  • World Heritage Sites
  • Additional permissions may be required if you intend to install elements such as floodlights or fences that are more than 2 metres high.

Maintenance Costs

To keep your court in optimal shape, regular maintenance is vital.

  • Cleaning and minor maintenance for hard courts can cost between £500 and £2,000 each year.
  • Artificial grass requires sand leveling and occasional cleaning, which costs between £500 and £1,500 per year.
  • Specialist surfaces require more maintenance, which ranges from £2,000 to £5,000 per year.

Is a Home Tennis Court Right For You?

A tennis court is an excellent investment for either a dedicated player or a homeowner looking to improve the value of their property. With careful planning, financing, and upkeep, you will be able to enjoy decades of matches on your own court.

How much does it cost to build a tennis court?

From low-cost hard courts to high-end synthetic choices, there’s something for everyone. A custom-built tennis court is an excellent choice for recreational, fitness, or competitive play.

What People Ask about Building a Tennis Court

1. What does it cost to create a tennis court?
The average cost of building a tennis court is £45,000, but this might vary depending on surface type, location, drainage, and equipment. High-end courts with premium materials and amenities can cost upwards of £70,000.

2. Which surface is optimal for a tennis court?
The optimal surface depends on your requirements:

  • Hard courts are long-lasting and require little care, making them suitable for year-round use.
  • Artificial grass: Soft and cushioned, ideal for players who value comfort.
  • Specialist surfaces (such as Omniclay) mimic professional clay courts while requiring less care.

3. Do I need to get planning clearance to create a tennis court?
Tennis courts are typically exempt from planning authorization because they fall under Permitted Development. However, planning clearance may be required in conservation zones, national parks, or when installing elements such as floodlights.

4. How big is a regular tennis court?
A full-size tennis court must have dimensions of at least 114 by 56 feet, including space around the playing surface. The actual playing space for doubles is 78 by 36 feet.

5. How long does it take to build a tennis court?
Construction normally lasts 6 to 8 weeks, assuming the site is clean and level.

6. Can a tennis court be utilized for other activities?
Yes, multi-sport surfaces such as Sporturf or artificial grass can handle activities such as basketball, netball, and five-a-side football.

7. How much does fence cost for a tennis court?
Installing a fence around the court will cost around £9,500. This shields the court from wildlife and prevents balls from becoming misplaced.

8. Is illumination required for tennis courts?
Floodlights are optional but recommended if you intend to play in the evenings. Floodlight installation normally costs between £100,000 and £20,000.

9. How long can a tennis court last?
With good upkeep, a tennis court can last

  • Hard courts: 20 to 30 years
  • Artificial Grass: 30 Years
  • Specialized surfaces: 15-20 years.

10. Are there any extra features I can include?
Extra features include:

  • Net poles and nets typically cost between £300 and £1,000.
  • Drainage systems cost £8,000 to £15,000.
  • Line marking: £500 to £1,500.

11. Can I build a tennis court on sloping land?
Building on steep or uneven terrain necessitates major leveling and preparation, which can significantly raise expenses.

Building a tennis court is an investment not only in your home, but also in your lifestyle. Whether for recreational play, competitive matches, or simply remaining fit, owning a personal tennis court offers convenience, enjoyment, and long-term value.

The project can meet a wide range of budgets, with expenditures ranging from £45,000 to £70,000 depending on surface type, location, and additional amenities. You can design a court that is specific to your needs and tastes by selecting the appropriate surface, ensuring sufficient site preparation, and accounting for required equipment.

While the initial cost may appear high, the benefits of having a dedicated facility for one of the world’s most popular sports make it a worthy investment. A tennis court could be the perfect ace to serve your aims, whether you’re an avid player or trying to add value to your home. Visit Quick News Feed for more insights and updates.